Introduction
Use this section to specify the date range, number of users, and other details about a particular session of a course.
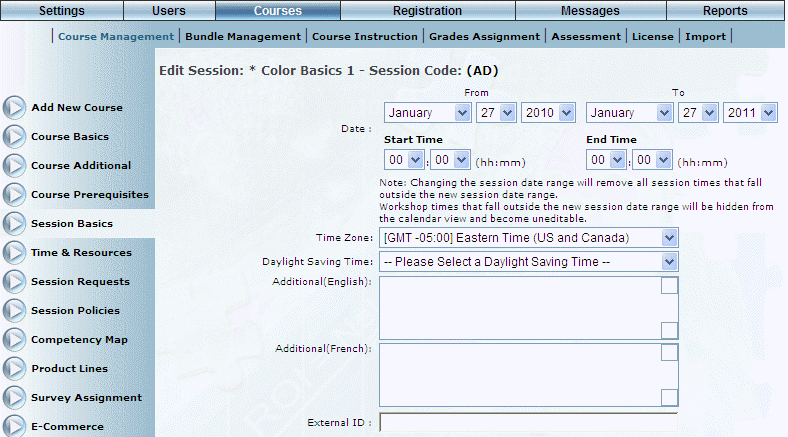
Note: Changing the session date range will remove all session times that fall outside the new session date range. Students who have registered with the original date will result in displaying the original date in the Registration area of LearnFlex.
You also need to specify the maximum number of users who can register in a session of a course overall, plus the number of users per community who are allowed to register in that session.
For example, if you specified a maximum of 20 users in a session, and have 4 communities, then you can specify that only 5 users from each community can register for that session. This ensures that some users from each community can register for a session. Additional users who want to register can be placed on a waiting list until more space becomes available. Or, you can also indicate that any number of users from any community can register for the session – in essence, a first-come first-served policy.
Procedure
1. From the Courses menu, click Add New Course.
The Course Basics screen is displayed.
2. Click Session Basics.
3. Click Edit beside the appropriate session.
The first section of the screen is displayed:
Editing Session Details
4. Click the session code link in the title to display the field where you can enter a new session code.
You can enter a maximum of 20 characters (alphanumeric).
Note: Leaving this field blank will make the session unavailable for reporting and some types of registration.
5. Use the Date – From and To drop-down lists to specify the dates when this session will be offered.
These dates default to the current date, and the last available year changes dynamically to show 15 years in the future based on the current year.
6. Use the Start Time and End Time drop-down fields to indicate the time (24 hour clock) within the date range that the online session will be available for launch from the learning plan.
For example, if you specify a start time of 11:00 and an end time of 14:00, then the Launch button for that session will be displayed at 11am on the specified day, and will be removed at 2pm on the end day.
Note: This only applies to Blended Online instructional media types.
Hint: If you want an exam to be available for a certain amount of time after a session ends, you will need to create that exam as a separate session.
7. Use the Time Zone drop-down list to specify the time zone where the session will occur.
The default value is defined through a global setting but can be changed here as needed. Contact your LearnFlex representative for details about the global setting.
This selection determines the values available in the next drop-down list.
8. Use the Daylight Saving Time drop-down list to associate a daylight saving time with the selected session.
The values available for the associated time zone are configured in the Daylight Saving Time module. This determines the times that are listed for sessions that are exported to a user's Microsoft Outlook calendar from their learning plan.
Note: This drop-down list is displayed when security setting 784: Daylight Saving Time is enabled.
9. Use the Additional text box to enter any other information to convey to the users who will be following the course in that particular session.
10. In the External ID field, enter a value that can be used for external reporting.
You can enter a maximum of 20 characters (alphanumeric).
The second section of the screen is displayed:

Editing Session Details - Community, Cost, Approvals and Credit Hours
11. You can set the number of participants in a session in the following ways:
· In the Session Size section, use the Minimum and Maximum fields to specify the minimum and maximum number of users across all communities who can register in the session.
Note: A value of 0 in the Maximum field indicates that an infinite number of students can enroll in the session.
Hint: Click the Fill Community Maximums button to populate the Maximum fields in the Community section with the session’s Maximum value.
The Minimum field can be reported on from within Report Builder. Additionally, you can use the value in this field in Message Management to update the course instructor when the event date is triggered and the minimum number of users has not been met; use the Class Minimum Message type to send this message.
· Check the Enable Waiting List box if you want those users who register after the session maximum has been reached to be placed on a waiting list. If more room becomes available in the session, these students may be allowed to register in the session.
Note: This box can be checked automatically through a global setting. Contact your LearnFlex representative for details.
· Place a number in the Wait List Maximum field to limit the number of users who can go onto the waiting list.
Note: Leave this field blank if you want the waiting list to have an infinite size.
· Check the Enforce Community Maximum box to ensure that only the maximum number of users specified above can register in the session. Checking this box is required when you want to enable the waiting list (specified above).
· In the Community Enrollment Size section, enter or update the maximum number of users who can register in the session at the community level.
Note: A value of 0 in the Maximum field indicates that an infinite number of students in this community can enroll in the session.
12. In the Cost Per Session field, enter the cost of running the session.
This value is used for general reporting purposes and in the Cost per Student report.
13. Use the adjacent drop-down list to select the currency associated with the cost of the course.
14. In the Cost Per Student field, enter the cost of running the session per student.
This value is used for general reporting purposes and in the Cost per Student report.
15. Check the Course Administrator Approval Required box to indicate that the course administrator must approve enrollment in the course before the user can register for it.
Any user who belongs to a cohort associated with the course curriculum group could be a course administrator, but the automated registration messages for approval will only be sent to the curriculum group head for the cohort.
16. Check the Manager Approval Required box to indicate that any manager above the learner in the business unit’s hierarchy can approve or deny enrollment.
17. In the Session Credit Hours field, enter a value that will be used to track users’ training progress tracking in their achievement records and will count toward the minimum credit hours needed for their community.
This value overrides the value specified on the Course Additional screen. However, the value entered in the Course Additional screen will be displayed in this field by default.
Hint: Use the Reset to Course Default button to return the credit hours value to the value entered in Course Additional.
You can enter a maximum of eight numbers in this field, including a decimal.
18. Check the Enable Attendance Marking box to enable attendance marking on the Users: Grades Administration, Courses: Grades Assignments, and Registration: Register and Grade screen.
19. Check the Enable Duration Marking box to enable duration marking on the Users: Grades Administration, Courses: Grades Assignments, and Registration: Register and Grade screen.
20. In the Default Duration field, enter a number to indicate the duration of time that the session is expected to run.
You can enter numbers between 1 and 100.
Note: This field is for reporting only and does not affect how long the session will run.
Tip: To define the actual length of a session, use the session Start Time and End Time drop-down lists at the top of the screen.
21. Use the Minimum Attendance Percentage field to indicate the minimum required attendance of the users.
Note: This field uses numbers between 1 and 100, and the % symbol is not required.
Note: This field has no effect on the automated grading process (for example: If a user attends less than the minimum attendance percentage, they will not be automatically failed from the learning activity). This number is strictly for administrator reporting from within Report Builder.
22. Check the Enforce Conflicts box to hide the Register button for the session when a time conflict occurs for the session, effectively preventing users from registering for courses that have a time conflict with a course in which they are already enrolled.
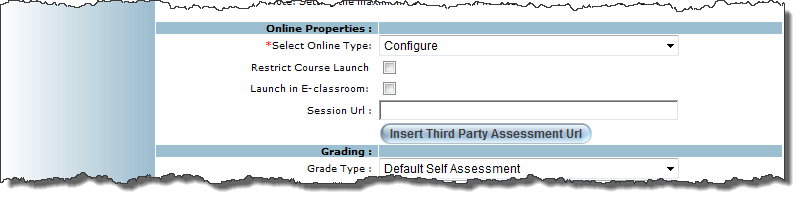
The Online Properties section is displayed:
Online Properties
Note: This section is displayed when the LearnFlex mode (global setting) is set to LMS. Contact your LearnFlex representative for details.
23. Use the Select Online Type drop-down list to indicate the online type for this session.
If you select Uploaded Course Content, then you will need to upload content for this session.
If you select External URL, then you need to specify the URL that will be available to users to access this course content. You can do this in two places: Session URL field (explained later in this topic), or on the Course URL field. The value in the Session URL field overrides the value in the Course URL field.
24. Check the Restrict Course Launch box to restrict the launching of this course.
Note: This box is not displayed when the instructional media for the course is set to Online Assessment.
Note: Checking this box restricts course launching (by default).
25. Check the Launch in E-Classroom box if you want users to be able to launch the course in an E-Classroom window.
Note: The E-Classroom is available only with content uploaded using the legacy engine.
26. In the Session URL field, enter the URL for this E-Classroom session.
Note: When LearnFlex is configured to use enhanced URL security (a global Site Security setting) and a URL not present in the URL Security list is entered in this field, an error is displayed upon launching the course.
27. Click the Insert Third Party Assessment URL button to replace the session's URL with the custom URL specified in the Content Manager - Third Party Assessment URL global setting.
You will be asked to confirm the operation.
Note: This button is displayed when security setting 681: 3rd Party Assessment URL has been enabled.
For information about specifying the Third Party Assessment URL global setting, contact your LearnFlex representative.
The Grading section is shown below:

Session Grading
28. Use the Grade Type drop-down list to set the type of grade for this session.
These values are defined in the Grade Settings module.
29. After selecting a grade type, use the Minimum Passing Grade drop-down list to specify the minimum passing grade for this course.
Your value must be between 0 and 100.
Note: Percentage grades on this screen are displayed as stored in the database, with a maximum of two decimal places, rounded to two decimal places if applicable. See the Grade Precision Overview for more details.
30. Check the Launch in E-classroom box if you want the course to appear in the e-classroom (must be a SCORM course).
The Auto Completion section of the Session Basics screen is shown:
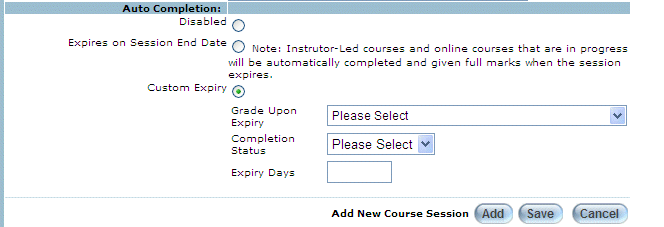
Auto-completing a Session
Use this section to indicate if a course that is in progress will be completed automatically and given full marks when the expiry date is met.
Note: This applies only to instructor-led and online courses.
Note: This section is displayed only when security setting 631: Course Auto-Complete is enabled.
31. Choose one of the following option buttons:
· Disabled: Indicates that courses will not be auto-completed.
· Expires on Session End Date: Indicates that applicable courses will be auto-completed on the same day that the session expires.
· Custom Expiry: Indicates that the session will expire using the following user-defined values:
· Grade Upon Expiry: Allows you to specify the grade that students will have if the session is auto-completed.
· Completion Status: Allows you to select the status of the session when it is auto-completed.
· Expiry Days: Indicates the number of days after registration that need to pass before the user is assigned the grade and completion status specified above.
The Assessment section of Session Basics is shown:
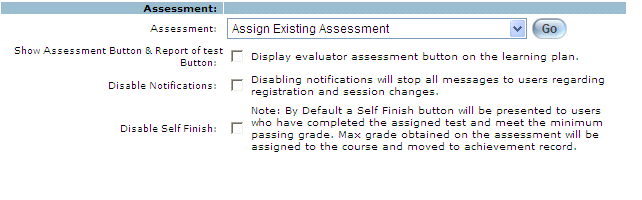
Specifying Assessment Options for a Session
Note: This section is displayed when security setting 226: Create & Assign Assessment to Session is enabled.
32. Use the Assessment drop-down list to assign an existing assignment to this session or create a new one.
33. Check the Enable assessment and assessment report boxto provide access to assessments and assessment reports on users' learning plans.
Note: This box must be checked to display the assessment's launch button on the new Learning Activity screen.
34. Check the Disable Notifications box if you do not want users to receive automated, system-generated e-mail messages when registering for and cancelling courses, changing session times, and so on.
This box is enabled by default and will not affect existing courses.
Note: This box is displayed when security setting 692: Disable Notifications is enabled.
35. Check the Disable Self Finish box to prevent a user from using a previous test attempt to assign a score for a current course grade instead of having to retake the test.
If checked, the Self Finish button will not be displayed even if a previous test attempt and grade exist. By default, this box is not checked.
Note: This function can only be disabled through a global setting. Contact your LearnFlex representative for more information.
The Report section is displayed:

36. Check the Show Interaction Report box to display additional details to the user about their SCORM test at the bottom of the SCORM report (shown after finishing the test).
These details include the type of questions, the student’s response, the result, the time when the answer was entered, and more. This is for informational purposes only. By default, this box is checked.
37. Check the Show Answer Keys box to show to the user the correct answer for every test question on the SCORM report screen after they have finished their SCORM test.
This is shown as an extra column in the interaction report (above).
The final section is shown below:

38. You can perform the following operations from this screen:
· Click Add to save your details and add the session to the course.
Note: When you click Add in a session that has already been saved, a new session is created with today’s date as the default start and end dates. All other settings from the original session, including any custom fields associated with the session, are copied and applied to the new session. You will need to click Save to save the new session.
· Click Save to save your changes.
· Click the first Save as New button to copy the session’s details, including any custom fields associated with the session, and create a new session with the original start and end dates.
Note: If you want to copy the workshops linked to the session, check the Replicate Workshops box and click the second Save as New button, as described below.
· Click Cancel to return any modified details to their default settings.
Note: When you cancel a session that has already been saved, you will be returned to the Session Basics screen. When you cancel a session that has not been saved, you will be returned to the top of the screen.
· Check the Replicate Workshops with Edited Dates box to copy the workshops linked to the session. You can copy the session’s start and end dates to a new session using the second Save as New button, as described below.
· Click the second Save as New button to copy the session’s details, including any custom fields associated with the session, and create a new session with replicated workshops.
Note: Security setting 601: Session Add as New must be checked to display both Save as New buttons and the Replicate Workshops with Edited Dates box in this section.