Introduction
Use this section to add or update information about the selected course.
Note: Some fields and values are only visible after the course has been saved, and not initially when the course is being created.
Procedure
1. From the Courses menu, click Course Management.
2. Click Course Search to locate the course that you want to manage.
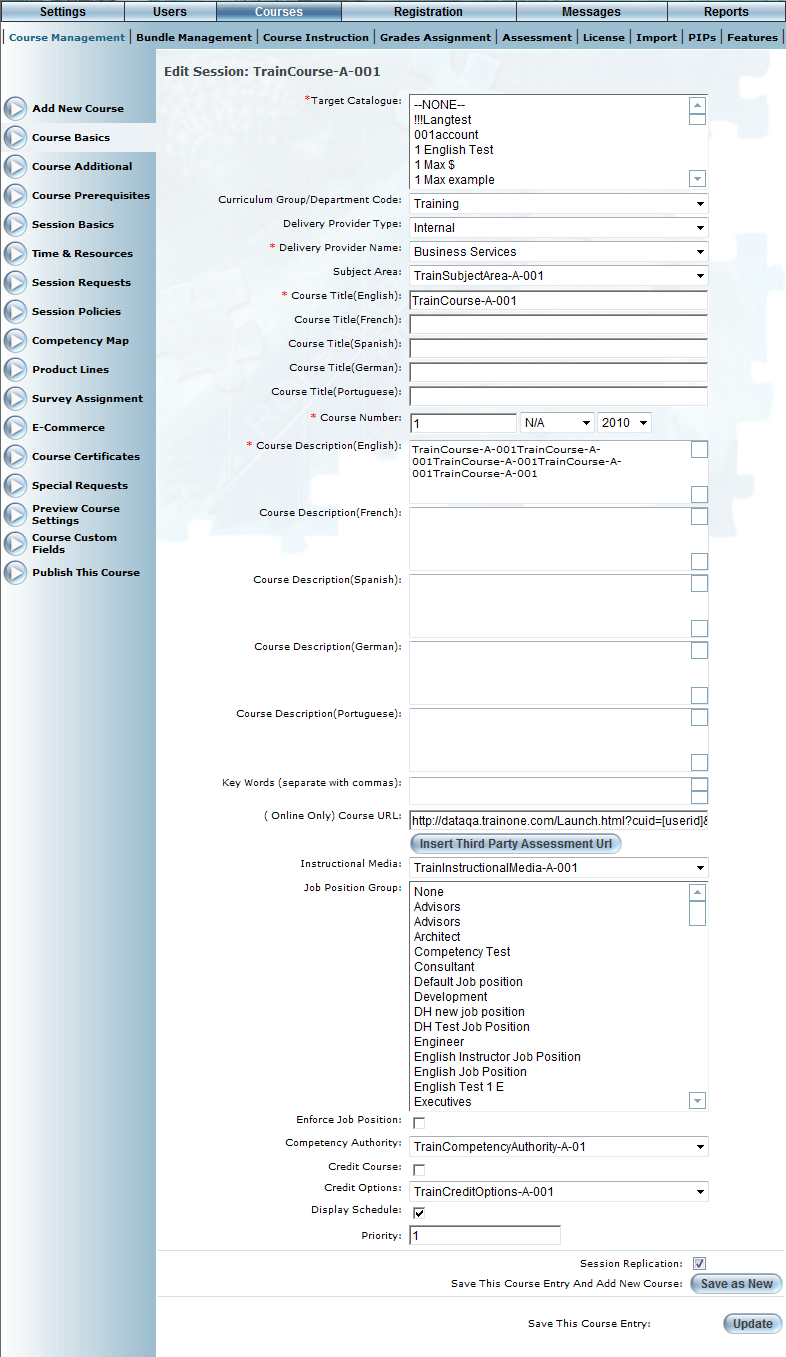
By default, the Course Basics screen is displayed:
Course Basics
Note: The Course Basics left-hand side menu is displayed when security setting 47: Course Basic is enabled.
3. Use the Target Catalogue drop-down list to select one or more catalogues to which this course will belong.
Users searching these catalogues will be able to see this course (based on their search criteria).
4. Use the Curriculum Group/Department Code drop-down list to select the curriculum group that you want to associate with this course.
This selection determines the following:
· The course administrators who (through cohorts) can view and manage this course and its related sessions.
· If configured within the curriculum group, the course number.
· If configured, the person defined as the head of the selected curriculum group will receive an email any time a user requests a session of this course.
5. Use the Delivery Provider Type drop-down list to specify if the person teaching the course is internal or external.
This selection determines the values available in the Delivery Provider drop-down list (next).
6. Use the Delivery Provider Name drop-down list to indicate the actual person (the delivery provider) who will be teaching the course.
7. Use the Subject Area drop-down list to specify the subject area of the course.
8. In the Course Title (English) field, enter the name that you want to give to your course.
Optionally, you can enter course titles for other languages if their fields are displayed.
You can specify a maximum of 250 characters (alphanumeric).
9. In the Course Number field, enter the number you want to give to your course.
You can specify a maximum of 13 characters (alphanumeric).
Note: This field may be displayed if you selected a curriculum group (done on this screen) that has been configured to auto-generate course numbers. See Adding, Editing, and Deleting a Curriculum Group for details.
10. Use the Course Number date drop-down lists to specify the season and year of the course.
11. Use the Course Description (English) box to enter a summary of the course.
This description will be available to students when registering for this course.
Optionally, you can enter course descriptions for other languages if their fields are displayed.
12. In the Key Words field, enter any words that you want to associate with this course.
Whenever a user enters this keyword during a course search, this course will be displayed in the search results. You can enter multiple keywords as long as they are separated by commas.
13. In the Course URL field, enter the URL that learners will use to access the content for this course.
By default, this URL applies to all sessions of this course, but can be overridden on a per-session basis.
This value is used for online and external URL courses only. This field will be filled in automatically for an online course. For an external URL course, you need enter its URL.
Note: This field is displayed only when the LearnFlex mode (global setting) has been set to LMS. Contact your LearnFlex representative for details.
14. Click the Insert Third Party Assessment URL button to replace the course's URL with the custom URL specified in the Content Manager - Third Party Assessment URL global setting.
You will be asked to confirm the operation.
Note: This button is displayed when two items are configured: 1) LearnFlex mode (global setting) is set to LMS. Contact your LearnFlex representative for details, and 2) Security setting 681: 3rd Party Assessment URL has been enabled.
For information about specifying the Third Party Assessment URL global setting, contact your LearnFlex representative.
15. Use the Instructional Media drop-down list to indicate how courses move from the learning plan to the achievement record.
These are defined in the Instructional Media module.
Note: This drop-down list is displayed only when the LearnFlex mode (global setting) has been set to LMS. Contact your LearnFlex representative for details.
Your selection in this drop-down list determines the display of:
· The Maximum attempts for course completion field on the Course Additional screen. Also, selecting Online, Blended Online, or Online Assessment will cause the Course Content left-hand side menu to be displayed (assuming that its security setting has been enabled).
· Restrict Course Launch box when editing session details.
16. Use the Job Position list box to specify those job positions whose users can see this course.
17. Check the Enforce Job Position box to indicate that only those users in the job position groups selected above can see and register in this course.
Checking this box also means administrators will be prevented from registering any user with a job position conflict (no job positions of the user match any job position specified for the course) during group registration of this course.
Hint: You can choose to ignore job position conflicts.
18. Use the Competency Authority drop-down list to specify the group that can administer the course, and is responsible for training.
The competency selected here will be displayed on this course’s competency map, which allows you to indicate that completing this course can also automatically complete selected competencies (within this competency authority). You can add or edit job position groups in the Competency Authority module.
19. Check the Credit Course box to indicate that this course is considered a credit course.
20. Use the Credit Options drop-down list to specify credit options for the course.
The values in this list are managed through the Credit Options module.
21. Check the Display Schedule box to display the view button that users can click to view the course's schedule in their Learning Plans.
This box is checked by default.
22. In the Priority field, enter a number between 0 and 999999 to indicate how the course will be ranked in searches.
The following check boxes may be available only when editing a course:
23. Check the Session Replication box to replicate the session information after clicking the Save as New button below.
24. Check the Replicate Course Content box to replicate the course content after clicking the Save as New button below.
25. You can perform the following operations from this screen:
· Click Save as New to save the course as a new one. You will be reminded to change certain aspects, such as the course number, of the course before you can save it as a new one.
Note: When selecting the Save As New button and checking the Replicates Course Content box (above) for a course that uses the enhanced engine for course content, the newly saved course will share the course content with the original course. All courses using this content will now show the latest version of content.
· Click Update to save your course changes.