Introduction
Use this section to upload course content to an online course shell (a course without any content associated with it) when the instructional media for the course has been set to Online or Blended online and the session has been designated as requiring uploadable content. Different options are available for you to indicate how course content will be uploaded.
Additionally, you can select the language to provide multi-language content for one specific course. Also, you can upload content to be available in desktop LearnFlex and/or LearnFlex Mobile.
Note: You can publish a course without having uploaded any content. However, a Launch button will only be available to users once content has been added.
Procedure
1. From the Courses menu, click Add New Course.
The Course Basics screen is displayed.
2. Click Course Content.
Note: This left-hand side menu is displayed when security setting 70: Course Content Upload is enabled and when one of Online, Blended Online, or Online Assessment has been selected from the Instructional Media drop-down list.
The following screen is displayed:

Course Content - Main Screen
3. Use the Session Code drop-down list to select the session whose content you want to manage.
4. Use the Language drop-down list to select the language in which the course content will be available.
5. Use the Platform drop-down list to indicate where you want the course content to be available.
You can choose one of the options below. Your selection here will determine the option buttons available later in this section.
· Desktop: Indicates that the content will be available only on desktop LearnFlex.
· Mobile: Indicates that the content will be available only on LearnFlex Mobile.
Note: Selecting either of these two options means that you cannot select Both for future content changes for the selected session.
· Both: Indicates that the content will be available on both desktop LearnFlex and LearnFlex Mobile.
Note: Selecting this option means that you cannot select either Desktop or Mobile for future content changes for the selected session.
Note: Your selections above determine the option buttons that are available below. For completeness, all option buttons are explained below.
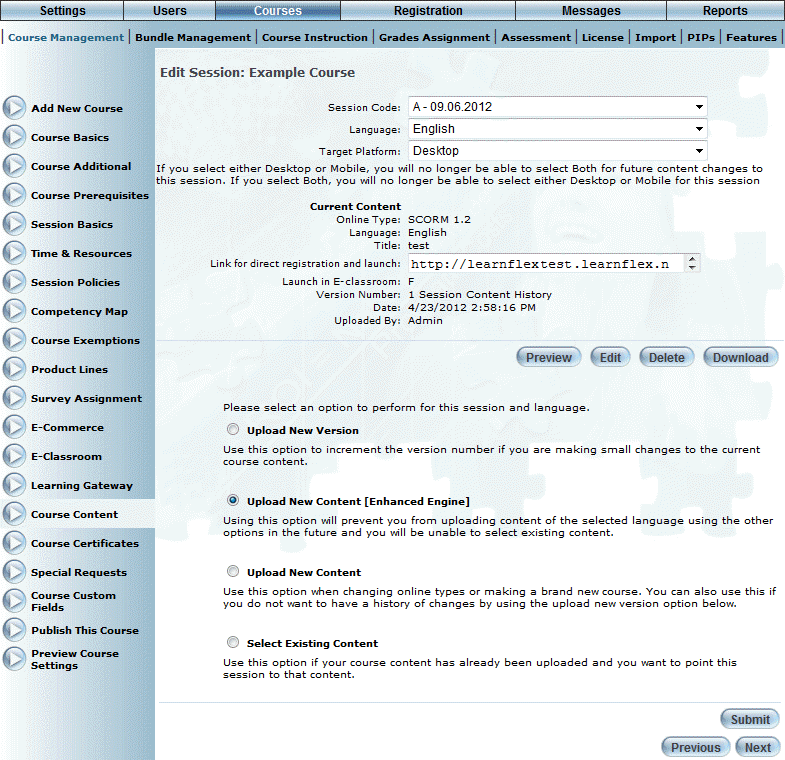
An example of the screen that may be displayed is shown below:

Course Content - Upload Options
6. To manage current content, you can perform the following operations (when available):
· Copy the Link for direct registration and launch to provide this URL to learners to directly register and launch this course session. See Register/Launch Link below.
· Click the Session Content History link (beside Version Number) to display a pop-up window containing a description of version details including the date added, the person who made the changes, version number, description, comments, and a link to download content.
· Click Preview to view the course as seen by a learner. This allows you to make sure that the course appears as it should before actually publishing it.
· Click Edit to change parameters of the existing content.
· Click Delete to remove the course content from the session.
Note: This button is displayed when security setting 71: Course Content Delete is enabled and the content was not uploaded using the enhanced engine.
· Click Download to retrieve the actual file that contains the actual content.
Note: This button is available only when course content exists for the session and content was not uploaded using the enhanced engine.
7. To manage new or changes to existing content, you can perform the following operations:
· Click Upload New Content (Enhanced Engine) to upload content to this session using the enhanced engine. Choose this option when uploading content for LearnFlex Mobile.
· Click Upload New Version to add a new version of existing content to this session.
· Click Upload New Content to upload content to this session.
· Click Select Existing Content to associate content already uploaded in LearnFlex to this session.
· For online courses with an external URL, review the details that are displayed.
The Link for direct registration and launch shown above can be provided to users through email, the Welcome Screen, or the Links screen, or posted anywhere (including external websites) that a link can be included.
Note: For this link to work, the session must have a unique External ID entered on the Edit Session screen.
When this link is clicked by a user, LearnFlex performs the following actions:
· Logs the user in to LearnFlex if single sign-on is configured and the user is signed on. If single sign-on is not configured or the user is not signed in, then the user is prompted to log in to LearnFlex.
· Registers the user in the course if the user is not already registered. If the user is restricted from registering in the course or if manager approval is required, then the user is prompted accordingly.
· Launches the course content for the appropriate platform (desktop or mobile).
Upon completion of the course, an unbranded Interaction Report is displayed. If the user has already completed the course, this summary is displayed instead of launching the course content.
Note: This requires feature tool configuration. Please contact your LearnFlex representative for more information.