Introduction
The Welcome page, also known as the Info page, refers to the home page (login page). Each community can have customized content and appearance, such as text, hyperlinks, tables, dates, and images. All images must reside in the WEBSOURCE/InfoImages folder and they must absolutely be referenced (for example, img src=http://your.learnflex.net/InfoImages/yourpic.gif/).
LearnFlex supports up to six customized pages for each community. The initial screen that users see is known as the default screen. The first numerically active screen is considered the default. This also gives the opportunity to post more content without having to access an external site. This also includes setting a default Welcome page for internal and anonymous users.
Note: Multiple pages appear as a sub-navigation bar under the top, horizontal navigation bar. However, the sub-menu (Home Page, Page 2) will only appear when there are two or more pages.
If there is only one active Welcome page for the community, then the sub-menu will not load any items and the only active page will be displayed.
There are no security settings for these sub-menu items as they are only enabled/disabled by activating them. If there is only one active Welcome page for the community then the sub-menu will not load any items and the only active page will be displayed.
Configuration
1. Create your community’s Welcome pages and activate them (explained below).
2. Through the Custom Links module, make sure that a Welcome link has been created. It must have the link of /users/info.asp.
3. Specify the main menu that you want as the default entry page through the community’s Basic Information screen. Assuming you select Welcome page, then your first active Welcome page will be the default.
4. Make sure that the Welcome menu is visible in User mode by enabling security setting 217: Welcome (custom link).
Procedure
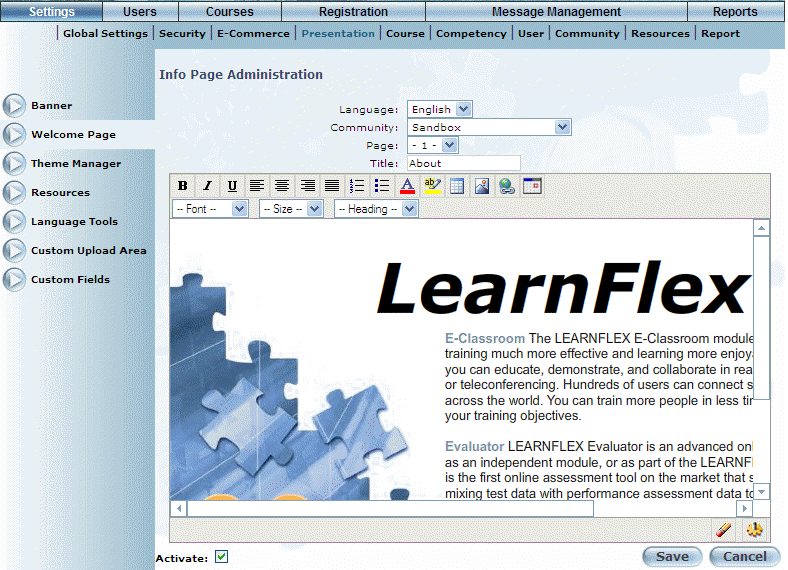
1. From the Settings menu, select Presentation.
2. Select Welcome Page from the left-hand side menu.
Note: This left-hand side menu is displayed when security setting 213: Info Page is enabled.
The following screen is displayed:
Welcome Page Administration
3. Use the Language drop-down list to select the dynamic language that must be selected for this Welcome page to be displayed.
The languages in this list are determined by a Client Setup global setting.
4. Use the Community drop-down list to specify the community whose users will see this Welcome page.
5. Use the Page drop-down list to indicate the page that you want to configure.
Remember: Users will see the contents of the first active screen (explained below) after logging in.
6. In the Title field, enter the title that you want to give to your Welcome page.
The title is displayed as a sub-menu of the Welcome screen in User mode.
7. Use the text box to customize your Welcome page.
You can enter free-form text then use the drop-down lists to change the font, size, and colour. Additionally, you can use the tool bar (just above the drop-down lists) to apply more customizations to your text, centre your content, and add links, tables, graphics, plus more.
Hint: Hover over each button in the tool bar to see its tool tip.
Note: The
background colour icon only changes the background colour of the editor,
and not for the selected page. To change the background colour of the
page, you will need to edit its HTML code (which you can access by clicking
the View HTML icon ![]() ,
located in the bottom right-hand corner of the editor screen).
,
located in the bottom right-hand corner of the editor screen).
8. Click the buttons in the lower right-hand corner to:
· Remove all formatting from text on the selected page. Note: You must select the text so that this feature can work.
· Click the View HTML button to format your page using HTML instead of WYSIWYG (the default).
9. Check the Activate box to make this page available to users.
If you do not check this box, then your contents will not be displayed.
10. Click Save to keep your changes.