Introduction
This set of properties represents the basic information for a community.
Procedure
1. After initially creating a community, click the Basic Information option.
Note: This left-hand side menu is displayed only when security setting 116: Basic Information is enabled while editing a community.
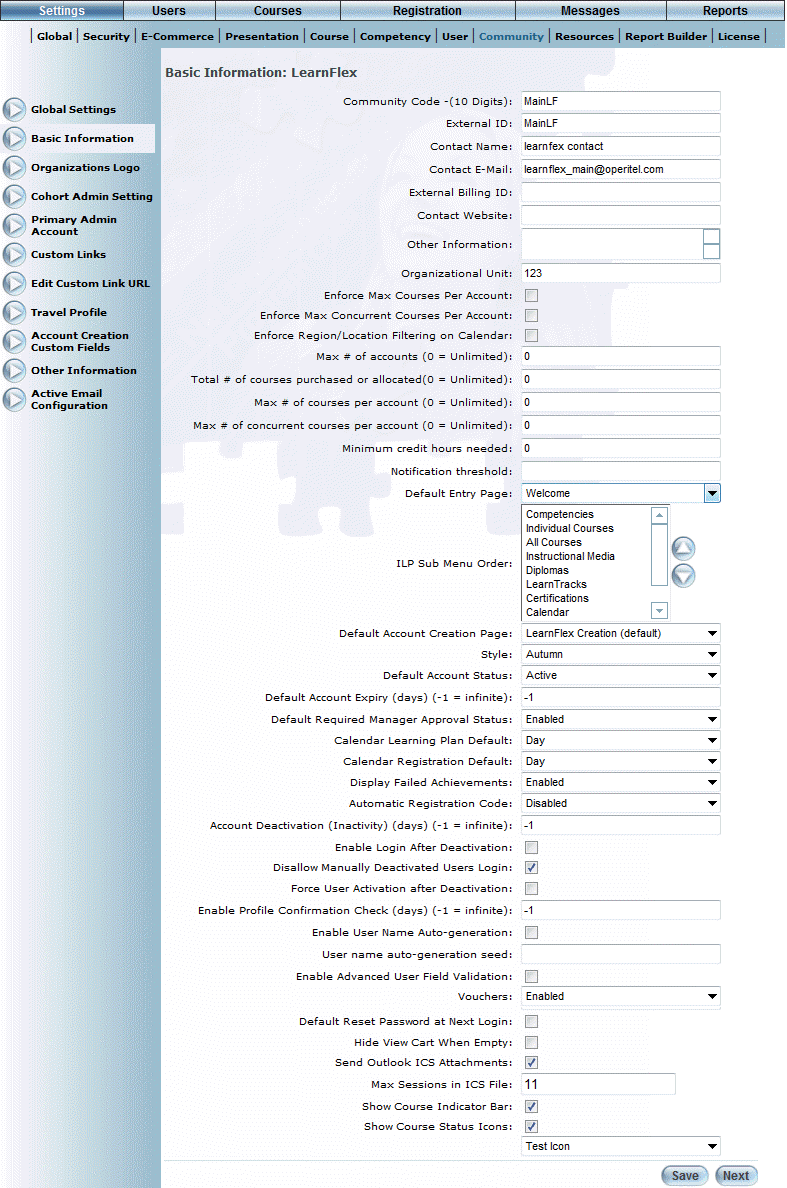
The Basic Information screen is displayed:
Community - Basic Information
2. In the Community Code field, enter a unique code to identify the community.
LearnFlex does not validate the uniqueness of the community name.
You can enter a maximum of 10 characters (alphanumeric).
3. In the External ID field, enter a value that can be used for external reporting and for importing.
4. In the Contact Name field, specify contact name for the community.
You can specify a maximum of 299 characters (alphanumeric). Additional characters will be truncated after saving.
5. In the Contact E-Mail field, specify a contact e-mail address for the community.
6. In the External Billing ID field, specify the ID that will be used for external billing resolution.
7. In the Contact Website field, enter the contact web site for the community.
8. In the Other Information text box, enter additional information about the community.
9. In the Organizational Unit field, specify the organizational unit of the community.
The default value is 123.
10. Check the Enforce Max Courses Per Account box if users in this account will be restricted to enrolling in the number of courses specified in the Max # of courses per account field (below).
11. Check the Enforce Max Concurrent Courses Per Account box if users in this account will be restricted to enrolling in the number of concurrent courses specified in the Max # of concurrent courses per account field.
12. Check the Enforce Region/Location Filtering on Calendar box if users will be restricted to viewing those courses within their specified region/location on the course calendar.
13. In the Max. # of accounts field, specify the maximum number of accounts that can exist in the community at one time.
Note: Imported accounts do not count against this maximum.
14. In the Total # of courses purchased or allocated field, specify the number of courses that can be purchased or allocated.
15. In the Max # of courses per account field, specify the maximum number of courses, per account, that can have enrollments.
16. In the Max # of concurrent courses per account field, specify the maximum number of concurrent courses, per account, that can have enrollments.
17. In the Minimum credit hours needed field, enter the minimum number of training hours that members of the community will be required to complete for the calendar year.
You can specify up to eight numbers, including a decimal, in this field.
Note: Entering a value in this field when the Advanced Credit Training box in Global Settings is checked will display a training progress tracker in the achievement records of the selected community’s members. Contact your LearnFlex representative for details.
18. In the Notification threshold field, specify a value for maximum notifications.
19. Use the Default Entry Page drop-down list to select the first screen that users in this community will see after logging in.
This list is populated by the values in the Edit Custom Link URL module. The default value is the Welcome screen.
20. Use the ILP Sub Menu Order list to set the order of sub-menu items on the Learning Plan screen.
To change an item’s position in the order, select it from the list and use the buttons beside the list to move the selected item up and down.
Note: Whether or not a specific Learning Plan sub-menu appears on the Learning Plan screen for a user will depend on the Learning Plan Security Settings for the user’s cohort.
Note: “Instructional Media” does not represent a specific sub-menu. Wherever it is positioned in the list, members of this community whose cohorts have security setting 158: Method of Instruction enabled will see a sub-menu for each instructional media type configured in Settings > Course > Instructional Media, displayed in alphabetical order.
21. Use the Default Account Creation page drop-down list to select a default account creation page.
22. Use the Style drop-down list to apply a style (or theme) that you can use in LearnFlex.
The values in this list are the active themes created in Theme Manager.
23. Use the Default Account Status drop-down list to specify the default status that will be applied to new accounts created in this community.
24. In the Default Account Expiry field, specify the number of days that must elapse without a successful login before users in this community will have their accounts set to Non-active (and therefore cannot log in).
A value of -1 means that the account will never expire.
Note: This value overrides the Client Setup global setting. Contact your LearnFlex representative for details.
25. Use the Default Required Manager Approval Status drop-down list to specify the default status that will be applied in this community when manager approval is required.
26. Use the Calendar Learning Plan Default drop-down list to indicate the default display of the learning plan calendar for users in this community.
27. Use the Calendar Registration Default drop-down list to indicate the default display of the registration calendar for users in this community.
28. Use the Display Failed Achievements drop-down list to specify if failed achievements should be displayed (Enabled) in the user's achievement record or not (Disabled).
This can occur, for example, when a user has failed or a course or if they have exceeded the maximum attempts to complete the course.
29. Use the Automatic Registration Code drop-down list to indicate if this option should be enabled or disabled when a user enters a registration code to activate their account.
30. In the Account Deactivation field, specify the number of days that user accounts in this community will be set to Non-Active (and therefore cannot log in) regardless of login activity.
You can specify a minimum of 31 days and a maximum of 999999999 days in this field. A value of -1 days indicates that user accounts will never be automatically deactivated for this community.
31. Check the Enable Login After Deactivation box to indicate that, If a user’s account is deactivated due to inactivity, then that account will automatically be set to Active when the user logs back into LearnFlex.
Note: This setting does not affect users who were manually deactivated.
32. Check the Disallow Manually Deactivated Users Login box to indicate that, if a user is manually deactivated, then that user will remain inactive even after attempting to log into LearnFlex.
The administrator will need to reactivate the account manually before that user can access LearnFlex.
Note: This setting does not affect users whose accounts were set to Non-Active due to inactivity.
33. Check the Force User Activation after Deactivation box to indicate that logging in will automatically reactivate the account of a Non-active user.
Note: This setting affects only those users who were manually deactivated.
34. In the Enable Profile Confirmation Check field, enter the number of days for enabling a profile confirmation check.
A value of -1 indicates that users’ accounts will never become deactivated in this community.
35. In the Days between profile confirmation field, enter the number of days users will be able to access LearnFlex without having to confirm their profile information.
When this is enabled, users will be presented with their profile information on the last day between confirmations. Users can skip past this information and access other parts of LearnFlex, but will continue to be directed to their profiles upon login until they have updated and saved their profile information.
Note: Entering a number in this field also indicates that new users within this community will be directed to their profiles upon their first time logging into LearnFlex.
Note: You must also select the screen to which users will be redirected from either the Custom Links or Edit Custom Link URL screens.
36. Check the Make profile confirmation mandatory box to indicate that users will be required to confirm the accuracy of their profile information before they can access any other part of LearnFlex.
Note: The Days between profile confirmation field and the Make profile confirmation mandatory box are enabled through a Global Setting. Additional configuration may be required before the profile confirmation feature will support your custom account creation functionality. Contact your LearnFlex representative for details.
37. Check the Enable Username Auto-generation box if user names should be automatically generated.
38. In the User name auto-generation seed field, specify the name that will be used as the base for automatically generated user names.
39. Use the Active Directory Account Management drop-down list to select the status of Active Directory for this community.
Note: The appearance of this drop-down list, and the default value, is determined by a global setting. Contact your LearnFlex representative for details. The value of the global setting overrides the value specified here.
40. Check the Enable Advanced User Field Validation box if advanced user field validation should be enabled.
41. Use the Vouchers drop-down list to indicate if users in this community can apply vouchers towards course registration (enabled) or not (disabled).
Note: A voucher group must be enabled for this community so that users in this community can use the vouchers in this voucher group.
42. In the LiveTutor Sub Client ID field, enter a value that enables LiveTutor on a per-community basis.
This option overrides the LiveTutor setting at the global level and allows you to report on LiveTutor-related activities (purchases, course launches, and so on) at the community level. LiveTutor information about all communities that do not have a sub-client ID is grouped together in reports.
Note: This overrides the value specified in the Client Setup global settings. Contact your LearnFlex representative for details about this global setting.
43. Check the Hide View Cart When Empty box to hide the View Cart link used to process E-Commerce transactions within the Courses/Registration menu in User mode.
Note: The View Cart link will be displayed when a user registers for an E-Commerce-enabled learning activity, even when this box is checked.
Note: This box is displayed when a Client Setup global setting is enabled. Contact your LearnFlex representative for details.
44. Check the Send Outlook ICS Attachments box to indicate that a Microsoft Outlook appointment attachment that contains session details should be sent to members of the selected community upon registration within a learning activity.
The Max Sessions in ICS File field (below) becomes available.
Note: Appointment files are sent only for learning activities with Instructor-led and Blended Online instructional media types.
45. In the Max Sessions in ICS File field, enter the maximum number of sessions for which the attachment will book appointments in users’ Microsoft Outlook applications.
Note: This must be a number between 1 and 365.
Note: The Send Outlook ICS Attachments box and the Max Sessions in ICS File field are available only when the External Email global setting is enabled. Contact your LearnFlex representative for details.
46. Check the Show Course Indicator Bar box to indicate if users within the selected community will see indicator bars for courses in a catalogue search.
These bars graphically display, for the user, the number of courses in each catalogue and subject area in which they have the following statuses: Completed, In Progress, Pending, or Available (number of courses available for user registration).
Each indicator bar has a default appearance for each status, but is indicated by a different colour. The number of registrations is indicated by the width of each bar.
Note: Only one status per course, and not session, is included as a count.
47. Check the Show Course Status Icons box to display the applicable icon for each course having a certain status as specified through the Course Icon Sets feature.
The icons are shown in the results of the Advanced search, Catalogue search, Competency search, Date search, and SkillSoft search.
Checking this box enables the drop-down list below.
48. When the box above is checked, use this drop-down list to select the course icon set that you want users in this community to see for courses with certain statuses.
49. Click Save to keep your changes.