Introduction
Now that you have determined what buttons users will see on their top, horizontal navigation bar, use this section to determine the order in which those buttons appear and the screens that the users access after clicking those buttons.
Procedure
1. From the Settings menu, select the Community submenu.
2. From the Please Select Community left hand side menu (not shown) select a community. The page will refresh and re-display as the Global Settings page.
Note: If you do not select a community first under Please Select Community and Global Settings, your changes will affect all communities.
3. Select Edit Custom Link URL from the left-hand side menu.
Note: The Edit Custom Links left-hand side menu is displayed only when security setting 91: Edit Custom Link URL is enabled.
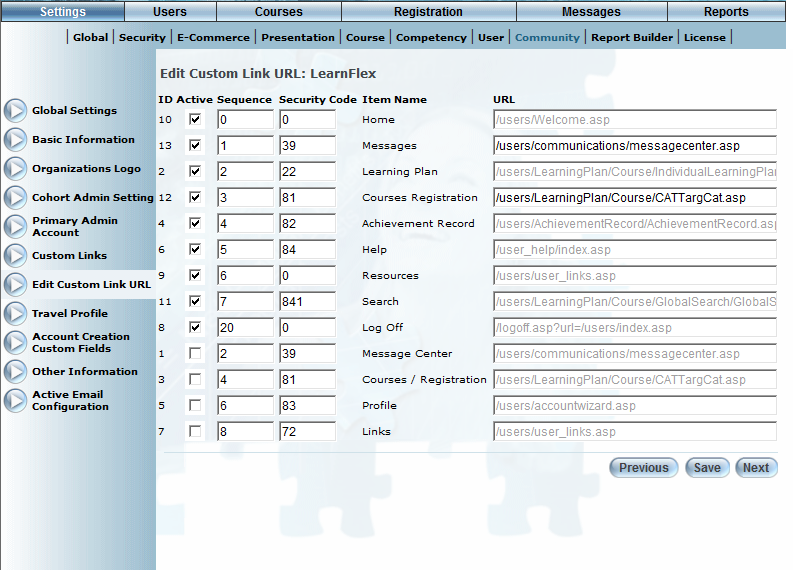
The Edit Custom Link URL screen is displayed:
Editing a Community and Its Custom Links
The ID column acts as a unique identifier for each of your URLs. For example you could make two different Link URLs with the same name and be able to differentiate them by the unique ID number.
4. Check the Active box for those links that you want to be displayed to users within this community.
5. In the Sequence field, enter a number to indicate the order of the links in User mode.
The lowest number (for example, 1) would appear first in the list (starting left to right).
6. In the Security Code field, enter the security setting associated with the link.
The security code is a maximum of 4 numbers, and the value corresponds to a valid LearnFlex security setting. For more information on these security objects and how to utilize them, contact your LearnFlex representative.
Note: If you are creating a new link that goes to a site outside of LearnFlex,, then you do not require a security code. Simply populate the field with the number 0.
7. In the URL field, enter the path that will be displayed in the web-browser when the user clicks the selected link.
Below is the list of the security settings and URLs that correspond with each menu:
Menu Name |
Security Setting |
URL |
Achievement Record |
82 |
/users/AchievementRecord/AchievementRecord.asp |
Courses/Registration |
81 |
/users/LearningPlan/Course/CATTargCat.asp |
Visual Reports |
857 |
/users/reports/UserDashboardReport.asp |
Dynamic Help |
767 |
/users/user_dynamichelp.asp |
Global Search |
841 |
/users/LearningPlan/Course/GlobalSearch/GlobalSearch.asp |
Help |
84 |
/user_help/index.asp |
Learning Plan |
22 |
/users/LearningPlan/Course/IndividualLearningPlanLF.asp |
Links |
72 |
/users/user_links.asp |
Log Off |
0 |
/logoff.asp?url=/users/index.asp |
Message Centre |
39 |
/users/communications/messagecenter.asp |
Profile |
83 |
/users/accountwizard.asp |
Welcome |
217 |
/users/info.asp |
What's New |
676 |
/users/whatsnew.asp |
8. From the Profile column, check the box beside the screen you want users to be redirected to to confirm their profile information.
Note: You must configure the profile confirmation functionality from the community’s Basic Information screen.
9. Click Save to keep your changes.