Introduction
The purpose of the calendar functionality in LearnFlex is to:
· Display a list of possible events, courses, and registrations to users.
· Allow users to quickly view in day, month, and year format all course offerings. The Day view makes it easier to identify conflicts and scheduling problems with existing instructor-led classes or workload without any visual assistance such as a calendar.
· Allow users to easily register for the event by directly linking from the calendar to the course registration screen.
· Display a current learning plan in calendar view to improve the usability of the calendar.
The following views are available to the user:
· View online courses.
· View instructor led courses.
· View blended online courses.
· View all instructional media.
· View by month.
· View by year.
· View by day.
· View by week.
Note: You can set one of these as the default on the Community Basics screen for any community.
The following functions are available to the user:
· Export to Outlook calendar format.
· Export to XML/RSS format.
Procedure
1. From User mode, click the Learning Plan menu.
The Learning Plan screen is displayed.
2. Click on the Calendar sub-menu.
Note: This sub-menu is displayed when security setting 589: Calendar is enabled.
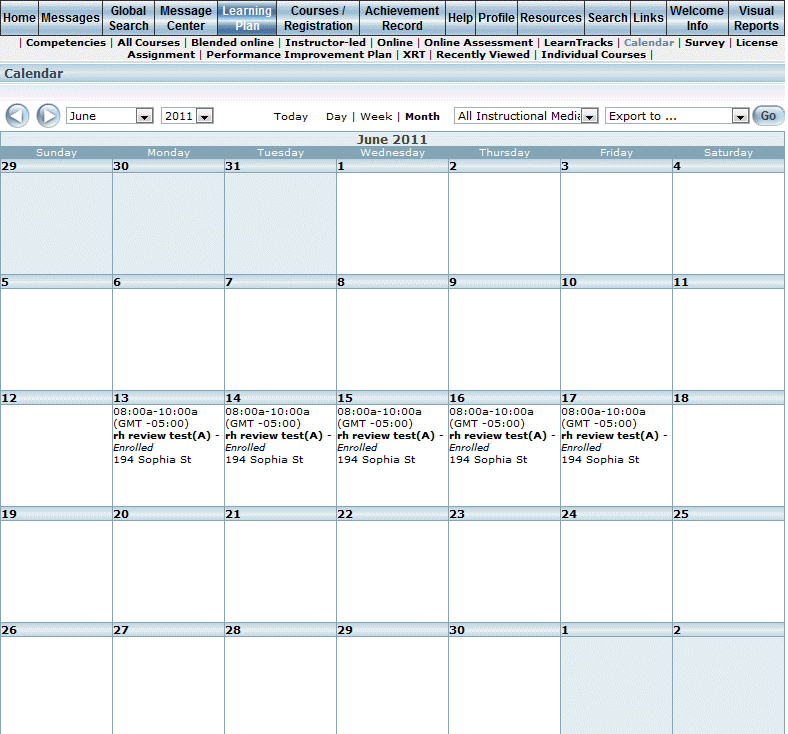
The following screen is displayed:

Learning Plan - Calendar (Month View)
This screen displays all sessions that occur every day within the selected month. By default, the current month is selected, and the current day is highlighted in orange.
3. You can adjust the views of the screen in the following ways:
· In the upper left-hand corner, use either the arrows or the month/year drop-down lists to change the month whose sessions you want to view.
Note: The last available year changes dynamically so that it shows 6 years before the current year and 15 years after. A drop-down list for the day of the month is displayed when the Day link (mentioned next) is selected.
· In the upper middle area of the screen, click any of the Today, Day, Week, or Month links to change the time frame of session you want to view.
· Use the All Instructional Media drop-down list to view only those sessions with a certain instructional media type.
· Use the Select Function drop-down list and select Go to export the information in the calendar in one of the following formats: ics, vcs, csv, or XML.
Note: This drop-down list is displayed when security setting 590: Calendar Advanced Function is enabled.
Appointment times exported to your Microsoft Outlook calendar with either an .ics or .vcs extension can reflect Daylight Saving Time when configured accordingly.
4. You can perform the following operations from the calendar itself:
· On any particular day, click the title (bolded) of the session to display a pop-up window of the Course Properties report. It contains details about the session that you can view and/or print if needed.
Note: The Job Position label is displayed when security setting 194: Job Position Display is enabled.
· When available, use the scroll bars on a calendar day to view additional session that are offered.