Introduction
This report displays users’ progress in meeting the target due dates of learning activities they are registered in.
To access this report, follow the configuration instructions.
Configuring the Overdue Course Report
1. Enable security setting 771: Overdue Course Report to display the Overdue Course report, the Time Allotted in Days field in courses, the Target Date Column in users’ profiles and the Calculate Time Allotted from Courses box in LearnTracks.
2. In the Time Allotted in Days field, enter the amount of days users will have to complete the course.
Note: You can use the Target Date column in users’ profiles to adjust the time allotted for each user enrolled in the applicable learning activity.
3. Check the Calculate Time Allotted from Courses box to set the LearnTrack due date according to the value entered in the Time Allotted in Days field for the mandatory course with the most amount of time allotted.
When this box is checked, the value in the Time allotted for completion field becomes unavailable and is populated with the value in the Time Allotted in Days field.
Note: The dates entered in these fields are for reporting purposes only and are not displayed in User mode.
4. Create an account custom field.
Note: The value entered in the External ID field for this custom field must be SupervisorName.
5. Enter a value in the new custom field on the Custom Fields screen of every user account you want to make available to the report.
Note: The value entered in this field will be the value that is shown in the Supervisor Name column in the report results.
6. Click Save on the Custom Fields screen of every account you want to make available to the report.
Hint: Users with access to custom fields in their User mode Profiles menus can enter and save their own supervisor’s names.
Procedure
1. From the Reports menu, select Standard, the Custom Reports.
2. Click the Overdue Course Report link.
Note: The link to this report is displayed when security setting 771: Overdue Course Report is enabled.
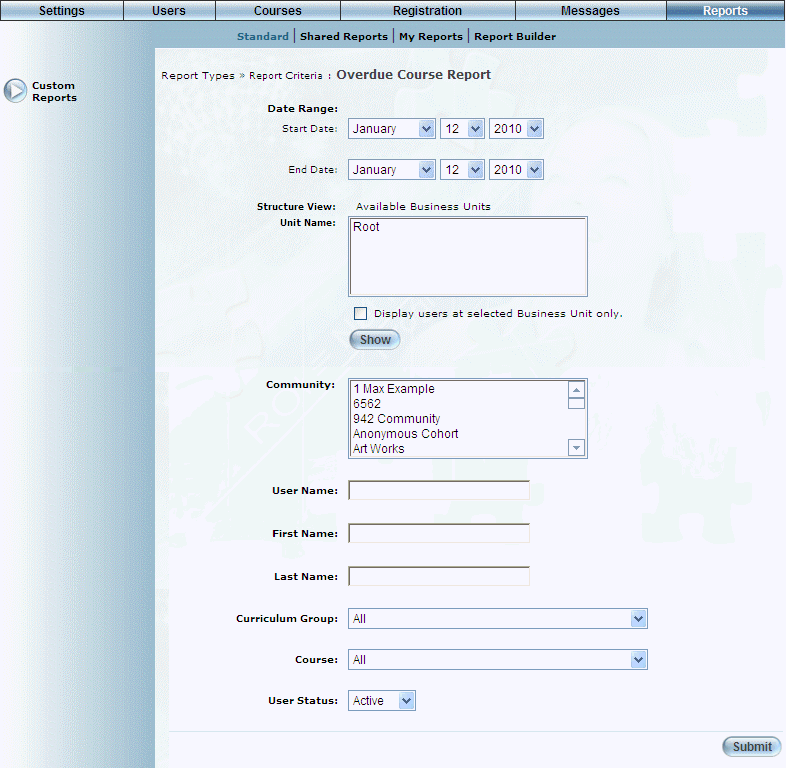
The following screen is displayed:
Overdue Course Report - Parameters
3. Use the Start Date and End Date drop-down lists to specify the date range to be included in the report results.
4. Use the Structure View section to select the business units you want to include in the report results.
5. Use the Community list box to select the communities you want to include in the report results.
6. In the User Name field, enter the user name of a user whose completion details you want included in the report results.
7. In the First Name field, enter the first name of a user whose completion details you want included in the report results.
8. In the Last Name field, enter the last name of a user whose completions details you want included in the report results.
9. Use the Curriculum Group drop-down list to select a curriculum group you want to include in the report results.
10. Use the Course drop-down list to select a course you want to include in the report results.
11. Use the User Status drop-down list to include active, inactive, or all users in your report results.
12. Click Submit to run the report.
The following screen is displayed:
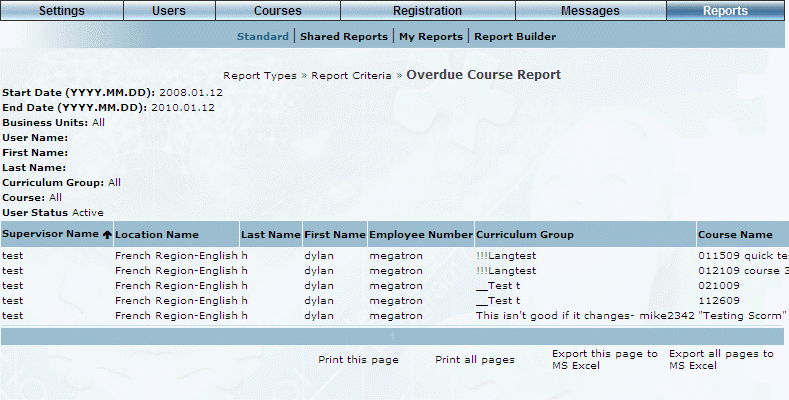
Overdue Course Report - Results
Note: The image above does not display all of the column headers available in the report.
This screen displays the results of your report. The following columns of information are displayed:
· Supervisor Name: Displays the value entered in Supervisor Name custom field in users’ profiles.
· Location Name: Displays the value selected in the Location drop-down list in users’ work addresses. If there is no location associated with a user, nothing is displayed in this column.
· Last Name: Displays users’ last names.
· First Name: Displays users’ first names.
· Employee Number: Displays the value entered in the User Name field within users' profiles.
· Curriculum Group: Displays the curriculum group to which the courses belong.
· Course Name: Displays the names of the courses in which users are enrolled.
· Course Code: Displays the codes of the courses in which users are enrolled.
· Registration Status: Displays users’ registration statuses in the course.
· Assignment Date: Displays the date the user was enrolled in the course.
· Due Date: Displays the date the course is due to be completed.
Note: This date is calculated by adding the number of days allotted for completion to the date the user was enrolled in the course.
· # of days allotted: Displays the number of days allotted to the course for completion.
· # of days elapsed since registration: Displays the number of days that have elapsed since the user was enrolled in the course.
· # of days +/- due date: Displays either the number of days remaining to complete the course (indicated by a negative number) or the number of days the course is overdue (indicated by a positive number).
Note: This value is displayed in red after the target due date has passed.
13. You can perform the following operations from this screen:
· Click Print this page to print the results on the selected screen.
· Click Print all pages to print results from all screens.
· Click Export this page to MS Excel to view the results from the selected screen in Microsoft Excel.
· Click Export all pages to MS Excel to view the results from all screens in Microsoft Excel.