Introduction
This section allows an administrator to manage a user’s courses. If a course session AND a user’s profile are marked as requiring administrator approval, the course will be listed in the first section of this screen.
Procedure
1. From the Users menu, click Add New User.
The Basic Information screen is displayed.
2. After entering and saving basic information, click the Course Administration left-hand side menu.
Note: The Course Administration left-hand side menu is displayed when security setting 94: Course Administration is enabled.
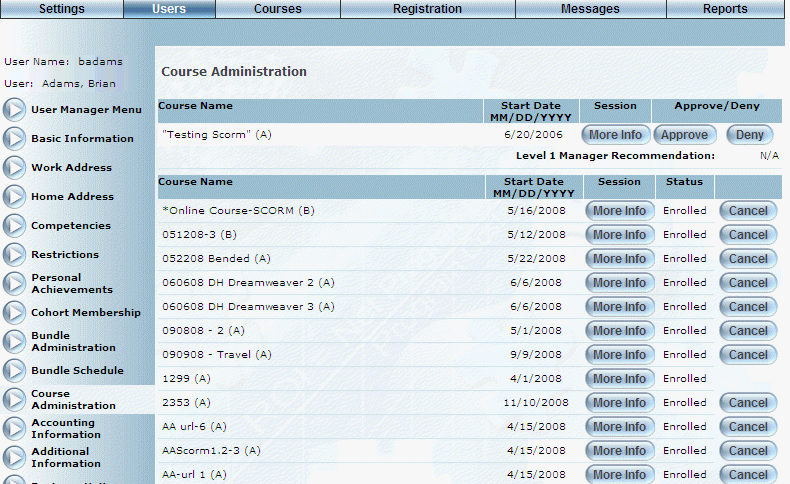
The Course Administration screen is displayed:

Course Administration
Note: Initially, this screen will not display any courses as this user is just being created. For the purposes of illustration, the example above shows a user that has registered for courses.
This screen consists of two sections: 1) the courses the user has registered for, but needs approval, and 2) the courses that the user has successfully registered for.
3. In the first section, the following columns are displayed:
· Course Name: Displays the name of the course for which the user wants to register.
· Start Date: Displays the date when the course is scheduled to start.
4. You can perform the following operations for the courses in this section:
· Click More Info to view additional information about the course. It is displayed in a pop-window, from which you can print the information or close the window.
· Click Approve to indicate that the user is enrolled in the course.
· Click Deny to indicate that the user cannot enroll in the course.
Note: Enabling security setting 543: Manager Approve/Deny Buttons displays the Approve and Deny buttons with the Course Manager Approval section (first section). It also displays the recommendation of the Level 1 manager (the administrator).
Note: If an administrator has already given their recommendation and security setting 544: Manager Approve/Deny Checkboxes has been enabled, then a green check or a red X will be displayed indicating the approval or denial.
In the second section, the following columns of information are displayed:
· Course Name: Displays the name of the course for which the user is registered.
· Start Date: Displays the start date of the course.
· Target Date: Displays the target due date of courses that have a value in their Time Allotted for Completion fields.
· Status: Displays the user’s status (Enrolled, Pending Admin Approval) in the course.
5. You can perform the following operations for the courses in this section:
· In the Target Date field, enter or modify target due dates for courses.
Note: If a target due date is entered for a course that does not have a target due date, the assignment date, number of days allotted, and number days elapsed information for the course and user will not populate in the Overdue Course report.
· Click More Info to view additional information about the course. It is displayed in a pop-window, from which you can print the information or close the window.
· Click Cancel to cancel the user out of the course. You will be asked to confirm the operation. Click OK.
Note: The Cancel button is displayed when security setting 593: Course Administration Cancel is enabled.