Introduction
Use this section to filter through the list of current user session requests, and to approve or deny them as needed.
Hint: You can use the Session Request report to view a history of all internal session requests.
1. From the Courses menu, select Course Management, then Session Requests.
Note: This left-hand side menu is displayed when security setting 747: Session Request Manager is enabled.
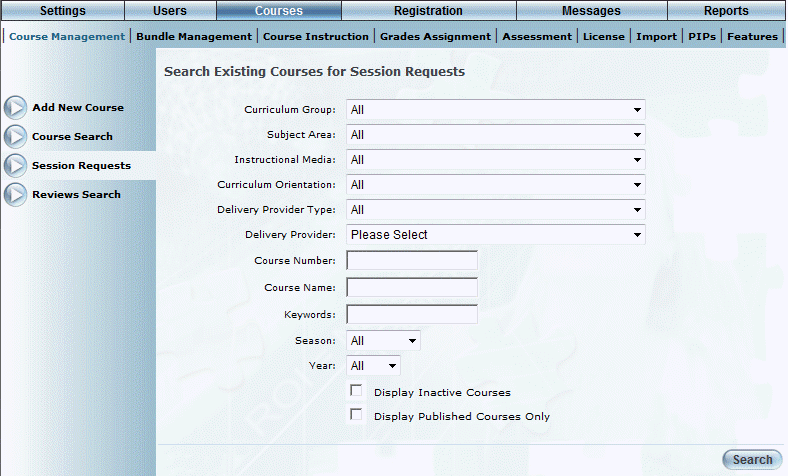
The following screen is displayed:

Searching for Session Requests
2. Use the drop-down lists, fields, and check boxes to filter your search for session requests.
As the search fields are the same as for a course search, see Searching for a Course for details about each of the options that you can select.
3. Click Search.
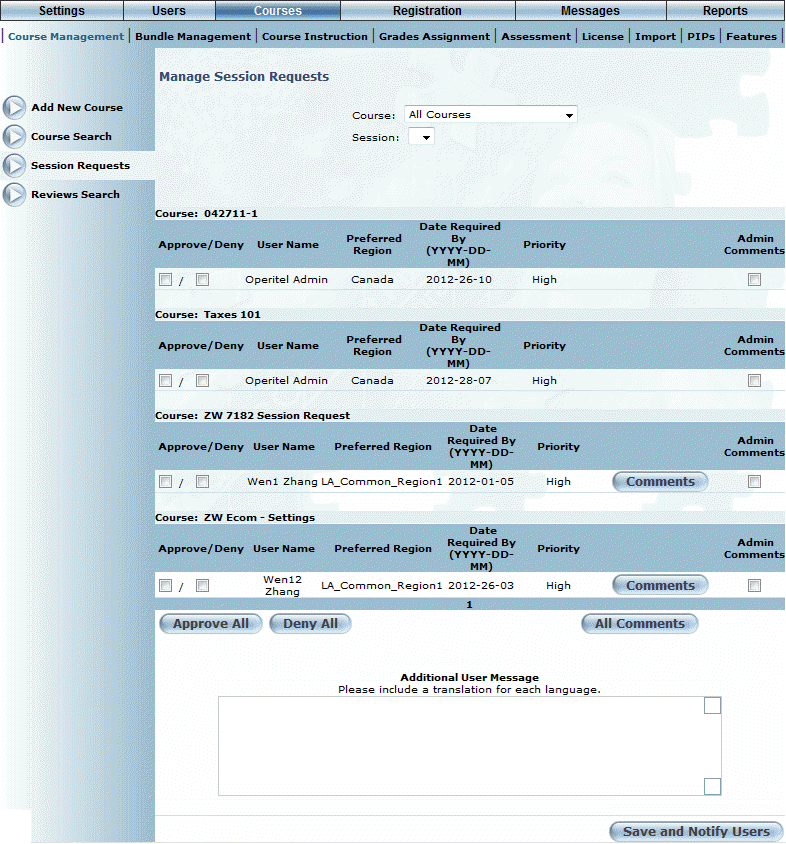
Your search results are displayed:

Session Request Search Results
This screen displays all of those session that match your search parameters and that have session requests.
Hint: If you have more than one course in your search results, you can use the Course drop-down list to view the session requests for the selected course. This drop-down list is displayed only when searching for a request. If you arrived at this screen from a selected course, then this drop-down list is greyed out.
4. To approve a request for a selected session made by one or more users:
· For selected sessions: Check the Approve box beside every session that you want to approve.
· For all sessions: Click the Approve All button. This automatically checks the Approve boxes for all sessions for all users.
5. To deny a session request for one or more users:
· For selected session: Check the Deny box beside every session that you want to deny.
· For all sessions: Click the Deny All button. This automatically checks the Approve boxes for all session for all users.
6. To view or enter customized comments about one or more session requests:
· To view a user’s comments entered about their session request: Click Comments beside the appropriate session request. A pop-up window is displayed with the user’s comments.
· To enter comments for a selected session: Check the Admin Comments box beside every session that you want to deny. Enter your comments in the Additional User Message text box (at the bottom of the screen).
· To enter comments for all sessions: Click the All Comments button. This automatically checks the Admin Comments boxes for all session for all users. Enter your comments in the Additional User Message text box. These comments will be sent to all users who have the Admin Comments box is checked.
These comments are in addition to the default messages sent to users regarding the approval or denial. Comments will appear in the body of the standard message. Depending on their configuration, users may receive an email and/or a message in their Message Centre.
Hint: If approving or denying multiple requests at once but for different reasons, it is recommended that you approve and deny in separate operations so that you can customize each message.
7. Click Save and Notify Users to send the updates and any messages to users.
Approved and denied requests will be removed from the screen.