Introduction
Use the Grades Administration module to view all of the published and unpublished courses that the user has both registered for and completed. Although grades are normally created automatically through the course, you can use this section to enter manually:
· Grade achieved in the course
· Date when the user completed the course
· Content that was completed
Hint: In the Transcript module, you can also administer grades on a per-course basis.
Note: You need to enable security setting 703: Allow Edit Grade to edit all fields on this screen. If not enabled, you can enter only private comments.
Procedure
1. From the Users menu, click Add New User.
The Basic Information screen is displayed.
2. After entering and saving basic information, click Grades Administration.
Note: This left-hand side menu is displayed when security setting 509: View/Change Grades is enabled.
The Grades Administration screen is displayed:
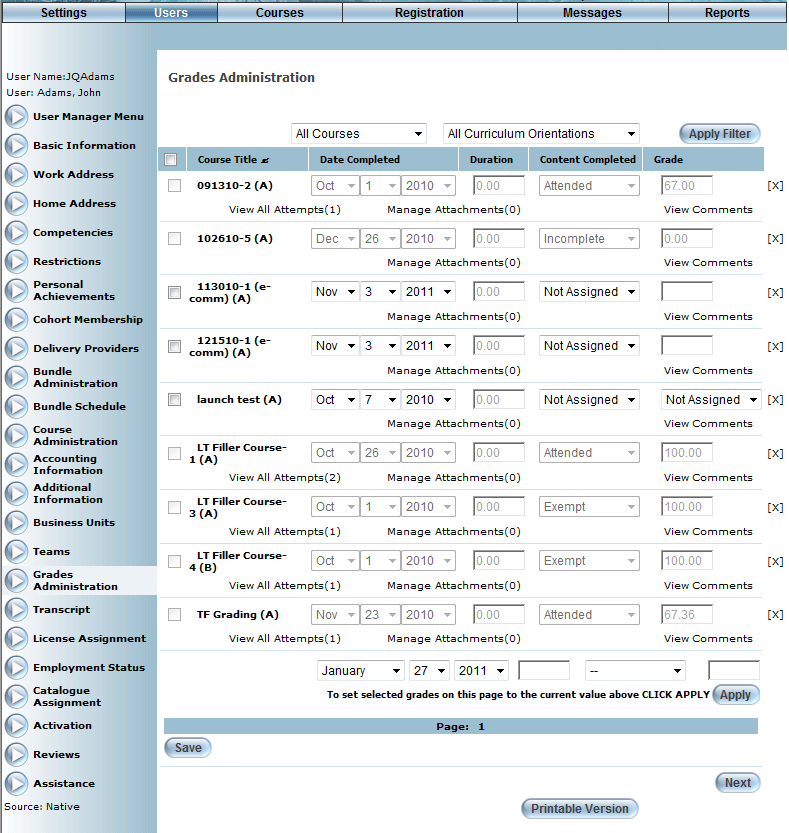
Grades Administration for a User
3. For individual courses, you can:
· Use the Date Completed drop-down lists to specify the date when the user completed that course.
· Use the Duration field to view the amount of time that the user spent in a session.
Note: The duration is manually recorded by the administrator on the Attendance Marking screen.
· Use the Content Completed drop-down list to select the user’s status in the course. These values are created in the Course Completion Status module.
· In the Grade field, enter the grade that the user achieved in each course.
Note: Based on the course configuration, some grades may require number values while others may require text.
4. To specify the same information for multiple courses, you can:
· Check the box adjacent to each course that you want to manage. To apply a change to all courses in the list, check the box in the screen heading (to the left of the Course Title column header).
· At the bottom of the screen, use the drop-down lists to specify the date when the user completed all of the selected courses.
· Use the Content Completed drop-down list to select the user’s status in all of the selected courses.
· In the Grade field, enter the grade that the user achieved in each course.
5. When available, click a View Attempts link to access another screen where you can:
· View all attempts at completing the course.
· Edit details, such as the Viewing and Managing All Attempts at Completing a Course grade and date completed, about the course attempt.
Note: This link is displayed when there is at least one attempt to complete the course, and when security setting 716: View All Attempts is enabled.
6. Click the Manage Attachments link to open the Attachment Manager to view and manage the attachments related to this user's grades.
7. When available, click the View Comments link to:
· View and update comments regarding the grade you are giving to the learner in the course. If you are manually exempting a user from a course, it is recommended that you add details about it so that the user will be aware of that when viewing the course from their achievement record.
· Use the Private Comments area to make notes about a user that he/she will not be able to see in their learning activity.
8. When available, click the View Certificate link to view a pop-up window associated with the learning activity.
9. Click the [X] link at the very right of each course to remove the course from the user’s grades administration.
10. Click Save to keep your changes.