Introduction
Community E-Commerce settings apply on a per-community basis. It allows you to specify settings such as the default status of a purchase order, accepted credit cards for course purchases, and more.
Some of your selections here trigger the display of other fields where you perform the actual configuration.
Procedure
1. From the Settings menu, select E-Commerce, then Community Settings.
Note: This left-hand side is displayed when security setting 299: Community Settings is enabled.
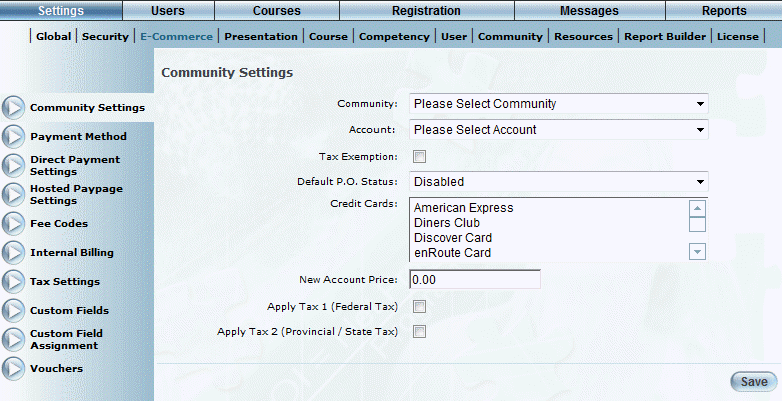
The Community Settings screen is displayed:
Community E-Commerce Settings
2. Use the Community drop-down list to select the community whose E-Commerce settings you are defining.
Note: This selection determines the next one or two drop-down lists that are displayed, depending on your configuration (for direct payment and/or hosted paypage). These instructions assume that you have configured both payment methods. An example is shown below:
3. Use the Direct Payment Account drop-down list to select the Skipjack or Beanstream account that users in this community can use for session payment.
The values in this list are taken from the Direct Payment Settings module.
4. Use the Hosted Paypage Account drop-down list to select the PayPal, Moneris, or eWAY account that users in this community can use for session payment.
The values in this list are taken from the Hosted Paypage Settings module.
The rest of the fields are displayed regardless of the community and payment methods selected.
5. Check the Tax Exemption box if users within the selected community should not be subject to taxes when purchasing courses or LearnTracks through any selected payment method.
This value overrides the Apply Tax selections later on this screen, and the per-session tax values as well.
6. Use the Default P.O. Status drop-down list to specify the initial status of purchase orders for users within this community.
This value can be changed on a per-user basis within Admin and User modes.
7. In the Credit Cards list, select those credit cards that users within this community can use when paying for courses.
8. In the New Account Price field, enter the amount that you want to apply to students registering for learning activities.
This field accepts a maximum of 9 numbers.
9. Check the Apply Tax 1 box if federal taxes should be applied to transactions by users in this community.
If this box is checked, then the box will automatically be checked in the Taxes section of an E-Commerce course.
Note: You will need to add federal tax settings for this community before taxes will be applied to a learning activity purchase. See Tax Settings for details.
10. Check the Apply Tax 2 box if state or provincial taxes should be applied to transactions by users in this community.
If this box is checked, then the box will automatically be checked in the Taxes area of the course's E-Commerce section.
Note: You will need to add provincial/state tax settings for this community before taxes will be applied to a learning activity purchase. See Tax Settings for details.
11. Click Save to keep your changes.