Introduction
Use this section to configure a standard message in LearnFlex.
Procedure
Step 1 - Selecting a Message Type
1. From the Messages menu, select Message Management.
Note: The Message Management sub-menu is displayed when security setting 510: Message Management is enabled.
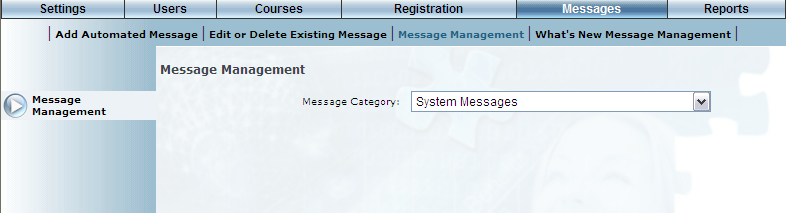
The following screen is displayed:
Message Management Screen
2. Use the Message Category drop-down list to specify if you want to create a system message or a configurable message.
3. Use the Message Type drop-down list to select the type of message you are adding.
Note: The LearnTrack 30 Days, LearnTrack 60 Days, or LearnTrack 90 Days message types are configurable messages.
4. Use the Email Media Type drop-down list to indicate if the message should be emailed only, or both emailed and sent to the users' Message Centre.
5. Check the Active box if you want this message to be sent out to applicable users when the required event occurs.
6. Click Save to keep your changes.
7. Click Next.
The Edit a Message screen is displayed:
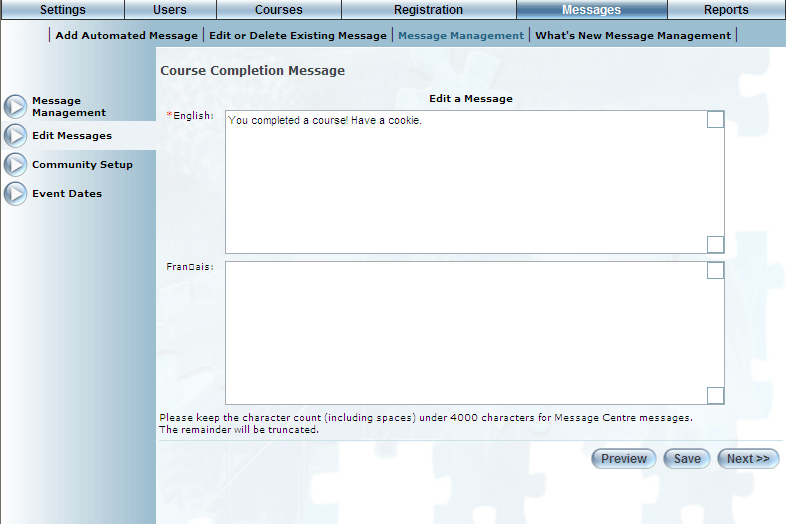
Editing a Message – Course Completion Message
1. In the English box, enter or update the text of the message.
2. You can click Preview to see what the message will look like before it is sent out.
The message preview will be displayed at the bottom of the current screen.
Note: The Enhanced Form Post Security global setting affects previewing course completion messages. Contact your LearnFlex representative for details.
3. Click Save to keep your changes.
4. Click Next to go on to the next step in the message creation process.
Step 3 - Specifying Community Details
The Community Set-up is displayed:
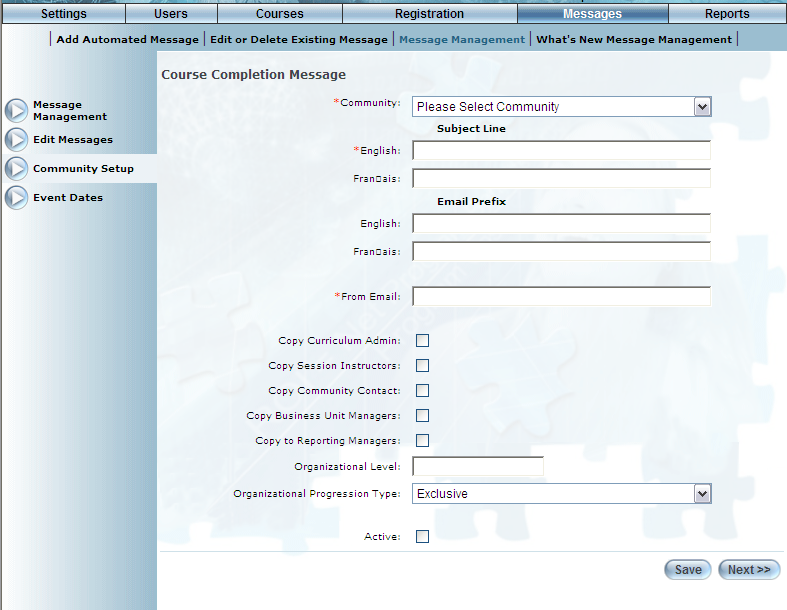
Course Completion Message – Community Setup
Note: The fields displayed above are dependent on the message type being added or edited. The screen above is an example.
1. Use the Community drop-down list to indicate the community whose users will receive this message.
2. In the Subject Line section, enter the subject of the message.
3. In the Email Prefix section, the name of the contact for this message.
4. In the From Email field, enter the email address of the contact for this message.
5. Check the Copy Curriculum Admin box to send the message to the curriculum group head.
6. Check the Copy Session Instructors box to send the message to session instructors.
7. Check the Copy Community Contact box to send a copy of the message to the community contact.
The community contact is set on the Basic Information screen.
8. Check the Copy Business Unit Managers box to send a copy of the message to business unit managers.
9. Check the Copy to Reporting Managers box to send a copy of the message to the user’s reporting managers.
10. In the Organizational Level field, indicate how many business unit levels up your business unit hierarchy will receive the message.
11. Use the Organizational Progression Type drop-down list to specify one of:
· Inclusive: Indicates that the course completion message will be sent to all levels of your business unit hierarchy (up to and including the level indicated in the Organizational Level field).
· Exclusive: Indicates that the course completion message will only be sent to the user and to the business unit level indicated above ( in the Organizational Level field).
For example if your business unit hierarchy has 4 levels (Level 0 the User, level 1 the Manager, level 2 the Super User and level 3 the Administrator), and you place the number 2 into the above mentioned Organizational Level field and then set the Organizational Progression Type drop-down to Exclusive, then the course completion message will be sent to the user (it will always go to the user by default) and the Super User (who is 2 levels up the Business Unit hierarchy from the user). Because it is set to Exclusive, the Manager (1 level up from the user) and the Administrator (3 levels up from the user) will not receive the course completion message.
Alternately, if you set the Organizational Progression Type to Inclusive and leave the number 2 in the Organizational Level field (mentioned above), then the course completion message will be sent to the user (it always goes to the user by default), the Manager (1 level up from the user), and the Super User (2 levels up from the user). But will not be sent to the Admin (3 levels up from the user).
12. Check the Active box to make the settings for this community active.
Any users within this community will receive a message when the event occurs.
13. Check the Send to Inactive Users box to have the message sent to inactive LearnFlex users.
Note: When you select the Competency Expiry Reminder message from the Message Type drop-down list, the Send to Inactive Users option will become available. Check the Send to Inactive Users box to ensure that inactive users will also receive the message.
14. Click Save to keep your changes.
The next screen in the process is displayed:
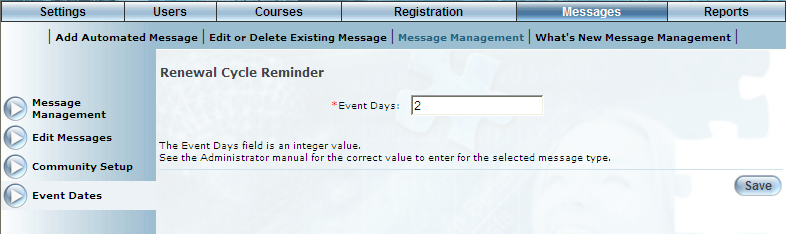
Course Completion Message – Event Dates
1. In the Event Days field, enter a value to indicate when the message will be sent out.
The value you need to enter depends on the message type. For example, some message types require this value to be negative (so that the message is sent out before a certain event) or positive (so that the message is sent out after a certain event). To determine which type of value you need to enter, see Types of Messages in Message Management.
2. Click Save to keep your changes.