Introduction
Some tests can be marked automatically, while others, such as essay questions, must be marked individually and assigned scores manually. When a learner completes an assessment that contains one or more essay questions, an email notification is sent to any administrators who are assigned to the session to which the assessment is assigned. Administrators can then access the responses requiring their attention from the Mark a Test screen.
This section explains how to mark a test manually.
Note: Percentage grades on this screen are displayed according to the global grade precision setting.
Procedure
1. From the Courses menu, select Assessment, then Mark a Test.
Note: This left-hand side menu is displayed when security setting 639: Mark a Test is enabled.
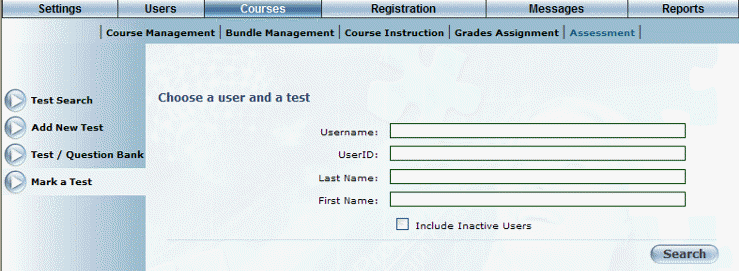
The following screen is displayed:
Marking a Test
Use this screen to locate the user whose test you want to mark.
2. In the Username field, enter the user’s login name.
3. In the User ID field, enter the user’s ID.
The user ID must be an integer greater than 0.
4. In the Last Name field, enter the user’s last name.
5. In the First Name field, enter the user’s first name.
6. Check the Include Inactive Users box if you also want to search for tests of inactive users.
7. Click Search.
Your search results are displayed:
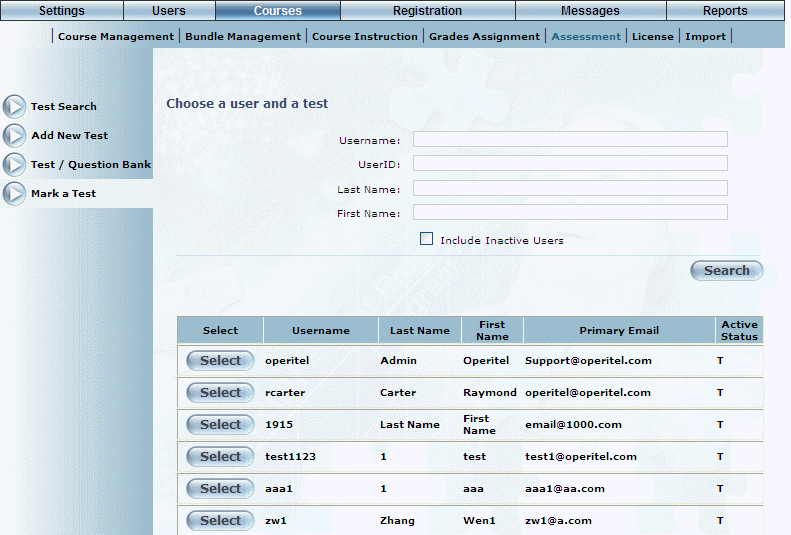
Mark a Test – Search Results
If security setting 677: Security is enabled and curriculum group have been assigned to the test, then this screen displays those users who wrote tests that were in the curriculum group that your cohort can access.
The following columns of information are displayed:
· Username: Displays the user name of the user who wrote the test.
· Last Name: Displays the last name of the user who wrote the test.
· First Name: Displays the first name of the user who wrote the test.
· Primary Email: Displays the email address of the user who wrote the test.
· Active Status: Displays the status of the user who wrote the test.
8. Click Select of the user whose test you want to mark.
The following screen is displayed:
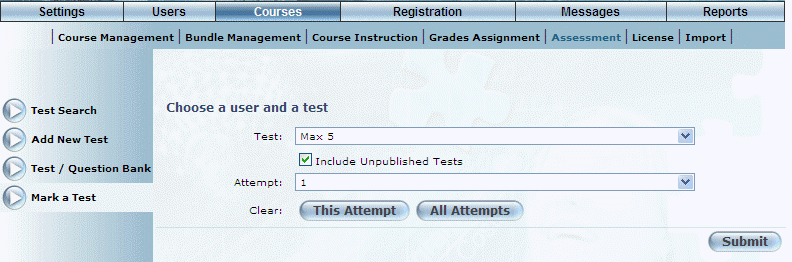
Selecting a Test to Mark
Use this screen to select the test that you want to mark.
9. Use the Test drop-down list contains all tests that this user has written.
Hint: You can change the list of tests by checking or unchecking the Include Unpublished Tests box. This allows you to mark tests that users have written and that have become unpublished.
10. Use the Attempt drop-down list to select the test attempt that you want to mark, assuming that the student has attempted that test at least once.
All tests in this will have had at least one attempt. Attempts for a reenrolled course are noted with “Reenroll” next to the attempt number.
11. Click Submit.
The text will be displayed where you can review and enter your marks. An example is shown next:
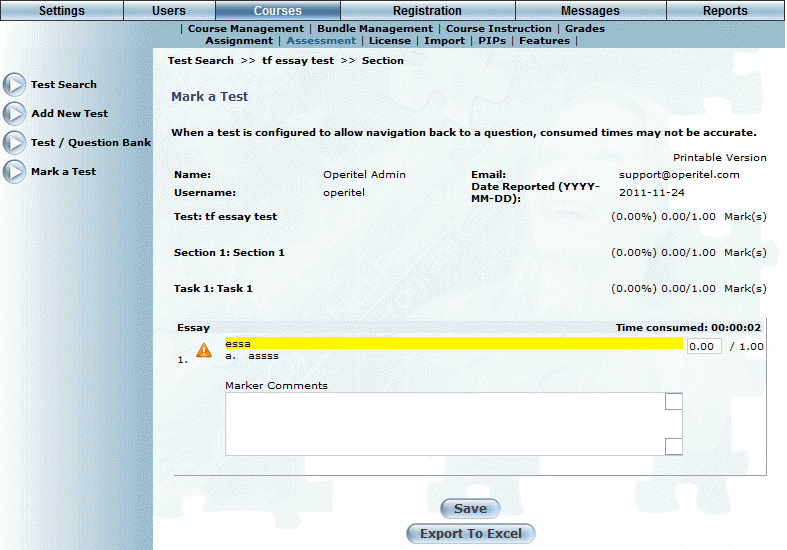
Submitting Marks
You can re-mark a test as many times as needed.
12. In the Grade field (not labelled), enter or update the user’s grade as needed.
13. In the Marker Comments box, enter any information about the mark being assigned.
14. Click Save to keep your changes.
15. You can perform the following operations from this screen:
· Click Export to Excel to send this information to Microsoft Excel.
· Click Printable Version (towards the top of the screen) to print the test as well as the saved grades and comments.