Introduction
Use this feature to create a voucher group. This consists of the individual vouchers, the communities who can use them, and more. Each voucher group will be available to users within selected communities and selected publishers.
Note: The Vouchers screens in Order Management are exactly the same as those in E-Commerce. Security setting 832: Vouchers must be enabled to display the Order Management Vouchers screen and security setting 742: Vouchers must be enabled to display the E-Commerce Vouchers screen.
Procedure
1. From the Vouchers main screen, click Add.
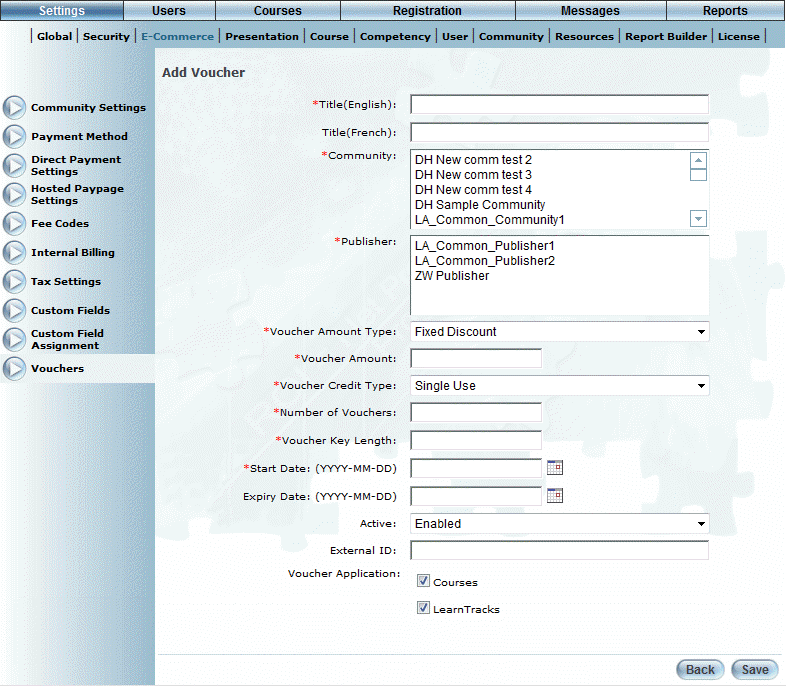
The Add Voucher screen is displayed:
Adding a Voucher
2. In the Title field(s), enter the name of the voucher you are creating.
3. In the Community list, select those communities who will be allowed to use this voucher when paying for courses or LearnTracks.
4. In the Publisher list, select those publishers whose courses will accept vouchers.
The selected publisher here must match the publisher of a selected course or LearnTrack to which the voucher can be applied.
5. Use the Voucher Amount Type drop-down list to indicate the how the voucher can be used for payment (fixed discount, relative discount, or gift card).
6. In the Voucher Amount field, enter the amount of the voucher.
For a relative discount voucher, you need to enter a percentage.
You can enter a maximum of 12 numbers (2 numbers for relative discount).
7. Use the Voucher Credit Type drop-down list to specify how often the voucher can be used.
This applies to gift cards only.
8. In the Number of Vouchers field, enter the number of vouchers that you want to create in this voucher group.
Hint: You can adjust the number of vouchers if needed, even if users have already used the voucher.
You can specify a maximum value of 1000.
9. In the Voucher Key Length field, enter the number of characters in the voucher key.
You must specify a value between 10 and 32.
Hint: The voucher keys are available when editing the voucher group.
10. In the Start Date field, enter the date when the voucher can first be used.
The date must be 1/1/2000 or later.
11. In the Expiry Date field, enter the date when the voucher can no longer be used.
This value is optional.
Note: A voucher expires only when this date is reached. A voucher with a value of 0 is still active.
12. Use the Active drop-down list to indicate if the voucher is enabled or disabled.
Vouchers can be used when registering for courses only when enabled here and within a community.
Because voucher groups cannot be deleted, making a voucher group inactive automatically inactivates all of the vouchers within it. Users cannot apply inactive vouchers to a course or LearnTrack purchase.
13. In the External ID field, enter a value that can be used for external reporting.
14. In the Voucher Application section, check the boxes to indicate where the voucher can be used – when registering for courses and/or for LearnTracks (bundles).
Note: If you check the Courses box, you can then indicate which courses are eligible for vouchers (called assigning a course). However, if you assign at least one course, then the voucher cannot be used for LearnTrack payment. To use vouchers for bundles, you cannot assign any specific courses to this voucher group.
15. Click Save to keep your changes.
![]()