Introduction
Account management allows administrators to search for new accounts, review them, and then activate or inactivate selected ones from one easy-to-use screen. You can base your search on user status, account creation date, last login date by users, among other parameters. You can send comments to the selected users about their account activation.
Note: Administrators can only view those accounts below their current business unit.
Once one has been activated, that user will immediately be removed from the Account Management list. The status of their account will automatically change to Active.
Note: Users who have logged in within the last 30 days will not qualify for deactivation.
Note: Activating an account from this location will still keep the profile verification check enabled.
Procedure
1. From the Users menu, select Account Management.
Note: This left-hand side menu is displayed when security setting 863: Account Management is enabled.
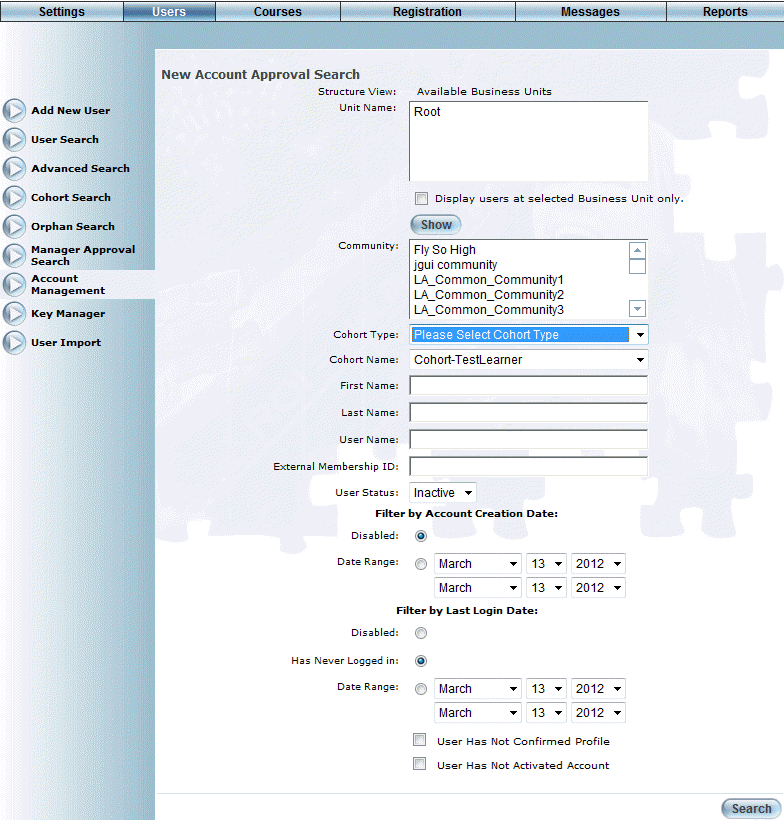
The following screen is displayed:
2. Use the Structure View link to navigate to the business units you want to include in the report.
You can:
· In the Unit Name box, select a business unit, then click Show to view the business units within the selected one. You can continue this process until you access the one you want to manage.
· Click either the Root or a business unit link in the Structure View section to return to that business unit.
The business units within the Unit Name box will be the ones included in the report.
3. Check the Display Users at Selected Business Unit only box to display only those users within the selected business unit only.
4. Use the Community list box to select one or more communities you want to include in your report.
5. Use the Cohort Type and Cohort Name drop-down lists to identify the cohort in which you want to search for users.
6. Use the First Name, Last Name, and/or User Name fields to narrow your results by the user's actual name or user name.
7. In the External Membership ID field, enter the external ID of the user for whom you are searching.
You can enter a maximum of 80 characters (alphanumeric).
8. Use the User Status drop-down list to view all users, active users, or inactive users.
By default, this feature searches for inactive users.
In the Filter by Account Creation Date section:
9. Select the option button to indicate if you do not want to filter by the date when a user’s account was created (Disabled) or if you want to filter by this date (Date Range).
If you select Date Range, you will need to specify the starting and ending time frame using the month, day, and year drop-down lists.
In the Filter by Last Login Date section:
10. Select the option button to indicate if you do not want to filter by the date when a user last logged in (Disabled), if you want to filter based on users who have never logged in (Has Never Logged In), or if you want to filter by a date (Date Range).
If you select Date Range, you will need to specify the starting and ending time frame using the month, day, and year drop-down lists.
11. Check the User Has Not Confirmed Profile box to include users who have not confirmed their profile in your search.
12. Check the User Has Not Activated Account box to include users who have not activated their account in your search.
13. Click Search.
Your results are shown:
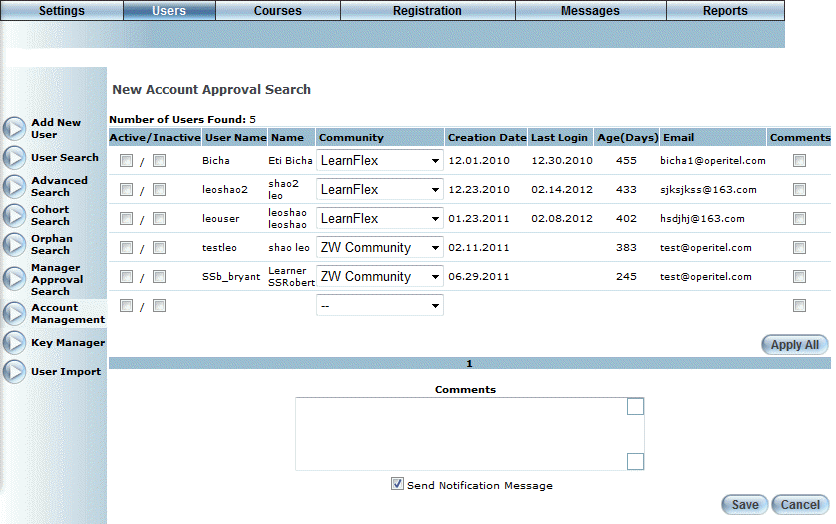
This screen displays all users that match your search criteria. The following columns in the table are explained below:
· User Name (link): Displays the name of the user who requires approval.
· Name: Displays the first and last name of the user associated with the account.
· Community (drop-down list): Displays the community to which the user belongs.
· Creation Date: Displays the month, day, and year when the account was created.
· Last Login: Displays the day, month, and year when the user last logged in to LearnFlex.
· Age (Days): Displays the age of the account.
· Email: Displays the user’s primary email address.
14. You can perform the following operations from this screen:
· Check the Active box for each user that you want to activate.
Alternately, check the Inactive box to make the selected user inactive.
Note: Users will remain in this list until they are activated.
· Click a user name link to go to the Basic Information screen of the selected user.
· Use the Community drop-down list to change the community to which the user belongs. You must do this in conjunction with checking the user’s Active or Inactive box.
· Check the Comments box to indicate that any comments entered in the Comments text box will be sent to the selected users.
· In the Comments box, enter any comments that you want selected users to receive.
· Check the Send Notification Message box to send a notification to the selected user in their Message Centre. By default, this box is checked.
Hint: To apply changes and comments to all users, use the very last blank row to: 1) Check the appropriate status, 2) Use the drop-down list to change the community for all users (blank keeps the users’ current community), 3) Check the Comments box to send comments to all users, 4) Enter comments in the Comments box if needed, and 5) Click Apply All.
15. Click Save to keep your changes.
Active users will be removed from the list. Once activated, the user’s activate date will change to the current date.
Inactive users will remain in the list as long as the community matches the search parameters.