Introduction
Use this section to add a Skipjack account to LearnFlex.
Note: You will need to enable security settings 744: Direct Payment Settings and 301: Skipjack Settings for the cohorts who will be configuring direct payment accounts in the E-Commerce sub-menu.
Note: Skipjack will need to provide some of the information requested below.
Procedure
1. From the Settings menu, select E-Commerce.
2. Select Direct Payment Settings from the left-hand side menu.
3. Click Edit beside Skipjack Settings.
4. Click Add.
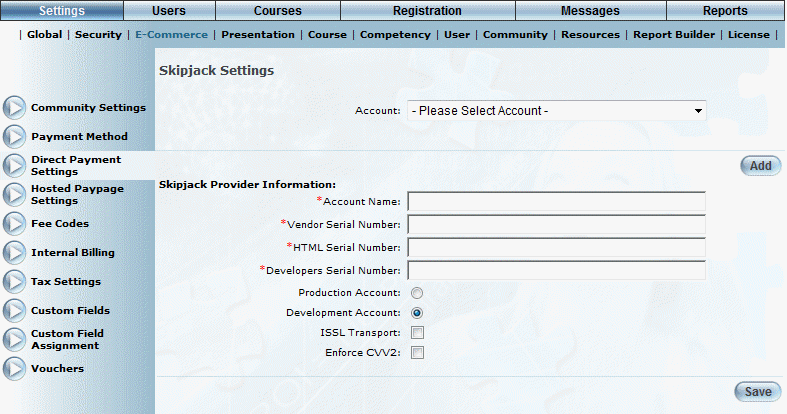
The following screen is displayed:
Adding a Skipjack Account
5. In the Account Name field, enter the name of the Skipjack account that you are creating.
This name is used internally within LearnFlex to distinguish one account from another. It will be available from the Community E-Commerce Settings module for selection.
This value is required.
6. In the Vendor Serial Number field, enter the vendor serial number as provided by Skipjack.
This value is required.
7. In the HTML Serial Number field, enter HTML serial number as provided by Skipjack.
This value is required.
8. In the Developers Serial Number field, enter the developer serial number as provided by Skipjack.
This value is required.
9. Select the appropriate option button to indicate if these settings apply to a Production Account or a Development Account.
This information is provided by Skipjack.
10. Check the ISSL Transport box if needed.
11. Check the Enforce CVV2 box to display the CVV2 field when a user purchases a course.
CVV2 refers to the 3 digit code located on the back of their credit cards. If CVV2 is enforced, then users in this community will need to provide this number when purchasing courses when Skipjack is enabled.
12. Click Save to keep your changes.