Introduction
Use this section to add a Beanstream account to LearnFlex.
Note: You will need to enable security settings 744: Direct Payment Settings and 755: Beanstream Settings for cohorts who will be configuring direct payment accounts.
Note: Beanstream will need to provide some of the details requested below.
Procedure
1. From the Settings menu, select E-Commerce.
2. Select Direct Payment Settings from the left-hand side menu.
3. Click Edit beside Beanstream Settings.
4. Click Add.
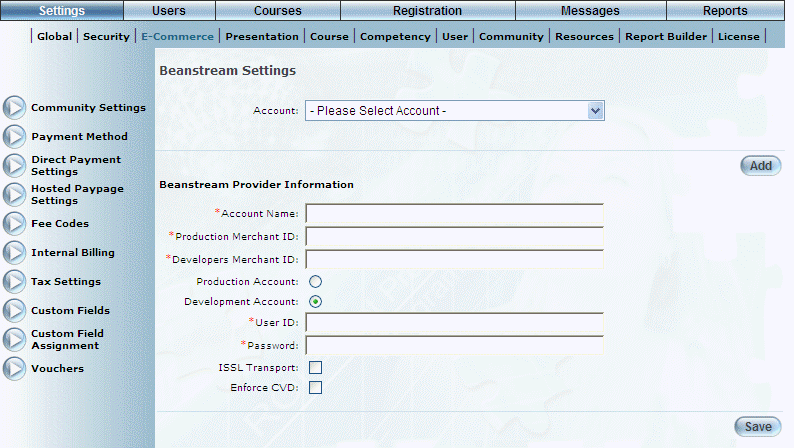
The following screen is displayed:
Adding a Beanstream Account
5. In the Account Name Field, enter the name of the account you are adding.
This name is used internally within LearnFlex to distinguish one account from another. It will be available from the Community E-Commerce Settings module for selection.
This value is required, cannot be blank, and must be unique.
Note: This field supports between one and 100 (alphanumeric) characters. If more than 100 characters are entered, the name will be truncated to 100 characters upon saving.
6. In the Production Merchant ID field, enter the production merchant ID supplied by Beanstream.
The production merchant ID is an active account with Beanstream used for processing live transactions. This value is required.
7. In the Developers Merchant ID field, enter the developers merchant ID supplied by Beanstream.
The developers merchant ID is an inactive account with Beanstream used for processing simulated transactions for testing purposes. This value is required.
8. Select the Production Account option button when configuring a Beanstream account for processing live transactions, or select the Development Account option button when configuring a Beanstream account for testing purposes.
9. In the User ID field, enter the Beanstream administrator user name.
This is an administrative account ID provided by Beanstream. This value is required.
10. In the Password field, enter the Beanstream administrator password.
This is the password for the administrative account provided by Beanstream. This value is required.
11. Check the ISSL Transport box to enable transaction handling in SSL-enabled environments.
Note: To use the Beanstream E-Commerce solution, SSL must be enabled in the LearnFlex Site Security settings in Global Settings. Contact your LearnFlex representative for details.
Note: At the time SSL/ISSL is enabled, the configuration change must be communicated to Beanstream so they can enable it on their server as well. The security will not be fully enabled until it has been enabled in LearnFlex and on Beanstream’s server.
12. Check the Enforce CVD box to enforce the verification of a user’s security code from the back of their credit card during the checkout process in User mode (CVV2 field).
13. Click Save to keep your changes.