Introduction
Before you can start editing, marking, or otherwise work with tests, you first need to search for test that you want to manage.
Procedure
1. From the Courses menu, select Assessment, then Test Search.
Note: This left-hand side menu is displayed when security setting 244: Search for a test is enabled.
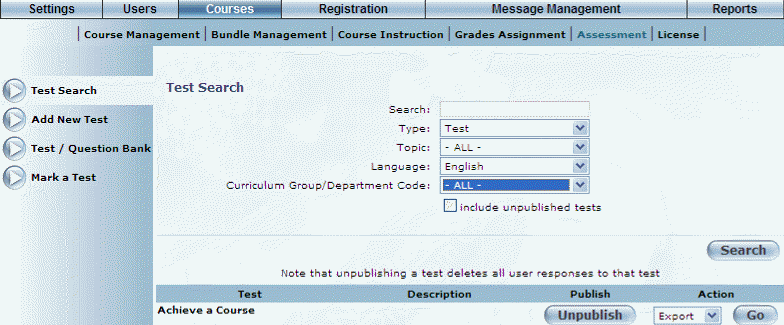
The Test Search screen is displayed:
Searching for a Test
This screen initially displays all tests based on the screen filters.
Note: The tests that you can search for depend on if security setting 677: Security is enabled. If enabled, you can search for those tests within your own curriculum group. Otherwise, you can search for all tests regardless of curriculum group.
2. Use the fields and drop-down lists to narrow down your search results.
3. Click Search.
Note: This button is displayed when security setting 223: Search for Test is enabled.
If you re-adjusted the search parameters, your search results are displayed.
Hint: The number of rows displayed per page can be changed through a global setting (Max Number of Rows per Page field). Contact your LearnFlex representative for details.
4. You can perform the following operations from the results section:
· In the test column, click the link of the test that you want to manage. Tests with the expand icon contain sub-tests that you can also manage.
Note: The links are enabled when security setting 251: Sections is enabled.
· Use the buttons in the Publish column to publish or unpublish the selected test.
5. If you see a test that you want to manage, use the Action drop-down list to perform one of the following operations:
· Export: Allows you to export a selected test. You will be asked to confirm the operation.
· Delete: Allows you to remove a test.
Note: This option is displayed when security setting 236: Delete Test is enabled.
· Preview: Allows you to preview a test before publishing it.
· Save as new: Allows you to make changes to a test and save as a new one. The new test will be available within the original test (a “+” will be available allowing you to access the new test). The new test will have the same name as the original but appended with the next sequential number in brackets. For example, if the original test was called ABC and you created one new test, that new test will be called ABC (1). This will also copy over any feedback details entered at any of the test, section, task, and/or question levels, including auto-enrollment details.
6. After making your selection, click Go to continue with that operation.