Procedure
1. From the Registration menu, select Order Management.
Note: The Order Management sub-menu is displayed when security setting 286: Order Management is enabled.
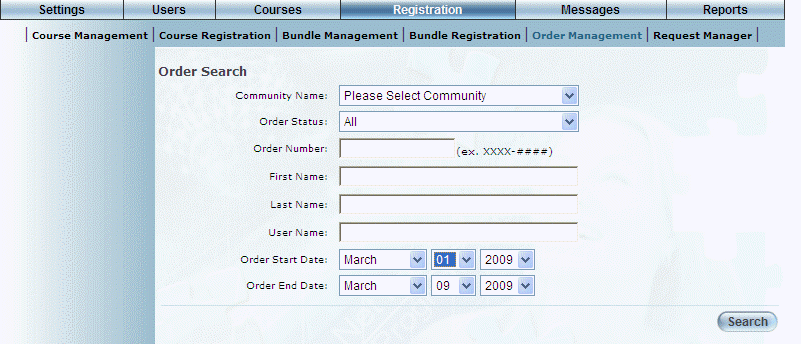
The Order Search screen is displayed:
Searching for Orders
2. Use the fields and drop-down lists to refine your search results.
You must specify a community name, order start date, and order end date.
Hint: For the order number field, our entry must be in the format of xxxx-#### (up to and including 4 letters and 4 numbers).
3. Click Search.
Your search results are displayed at the bottom of the screen:

Viewing Search Results
The following columns of information are displayed:
· Order Number (link): Displays the number of the order within LearnFlex. This value is generated automatically.
· Name: Displays the name of the user who entered the order.
· Order Date: Displays the date and time when the order was entered. It will not reflect any changes that have been made.
Note: You can change the date display of this column through a global setting. Contact your LearnFlex representative for details.
· Status: Indicates the status of the order.
· Amount: Indicates the amount of the transaction.
· Payment Method: Indicates how the order was purchased.
· P.O. Number – Transact ID: Displays the unique identifier of the transaction.
4. Click an order number link or Edit to update that particular order.
The Order Information screen displays as below:
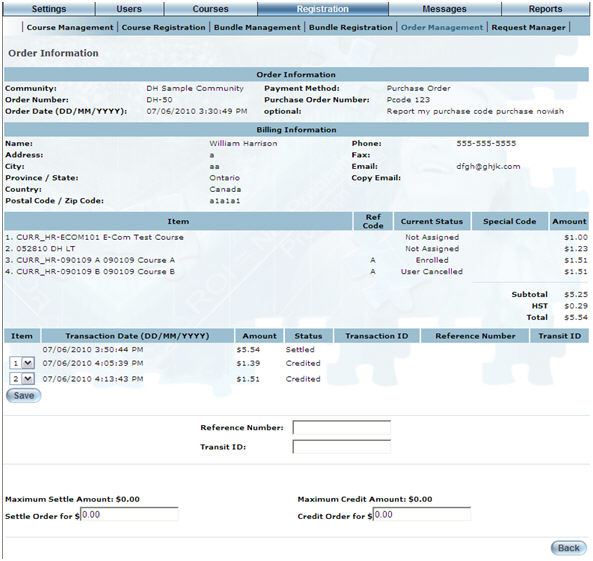
Order Information Screen
This screen displays details about the selected order. The Order Information section displays details about the actual order. The Billing Information section displays details about the person who made the purchase. The Item section indicates what was purchased. It will also indicate if any discounts have been applied to the purchase order (Special Code value) or vouchers (neither shown above).
The Tax Analysis section displays a breakdown of taxes applied to the order. This section is displayed only if one or more taxes are applicable.
The Transaction section displays details about each action made in this order. The Transaction section also displays an Item drop-down list, on the bottom left of the page, which allows the administrator to associate specific transaction orders with individual items (a function that can be reported on in the E-commerce Transaction report, allowing for the crediting of cancelled transactions). Finally the initial purchase, as well as any refunds or changes, will be shown here.
5. You can perform the following operations:
· Update an order custom field: In the Order Information section, click the name of any custom fields that are displayed (in the example above, it is called Smoke Test) to update the value entered for the custom field.
· Settle the order: This allows you to enter any amounts outstanding. To do this: 1) In the Settle Order for field, enter the amount being applied towards the order. The order amount will be entered in here by default, but you can change it as needed. You can enter a maximum of 8 numbers in this field. 2) In the Reference Number and Transit ID fields, enter values that can be used to track this transaction. These values are optional. 3) Click Settle. The status of the order changes to Settled.
Note: If the order has already been settled with an amount equal to or greater than the order amount (as indicated in the Transaction section with a status of Settled), then the Settle button will not be available.
· Credit the order: This allows you to refund money to the purchaser. They can be credited only the maximum amount of the order. 1) In the Credit Order for field, enter the amount of the credit. You can enter a maximum of 8 numbers in this field. 2) In the Reference Number and Transit ID fields, enter values that can be used to track this transaction. These values are optional. 3) Click Credit to apply it to the order. The status of the order changes to Credited.
Note: If the order has already been settled with an amount equal to or greater than the order amount (as indicated in the Transaction section with a status of Settled), then the Settle button will not be available.
Note: You cannot credit an order that has only been authorized. Also, you cannot re-settle an order that has been credited.
· Identify Credited Items: In the Transaction section, use the Item drop-down list to select the number which corresponds to the credited item’s number in the item list.
For example, in the image above, the second transaction (for $1.39) in the transaction list has been credited to item number 1 (an E-Com Test Course) in the items list above, and the third transaction (for $1.51) in the transaction list has been credited to item number 2 (a DH LT course) in the items list above.
You can use the Item drop-down list to identify which items in the order a credit was applied to, so that when the E-Commerce Transaction Report is run, the credited items can be identified.
Note: The Item drop-down lists are displayed beside the items in a transaction only when at least one item in the transaction has been credited and the background process which completes the transaction in LearnFlex has run.
Note: When you assign an item number to a transaction, this information becomes available in the E-commerce Transaction report.