Introduction
This report shows a summary of E-Commerce transactions.
Procedure
1. From the Reports menu, select Standard, then Custom.
2. Click the E-Commerce Transaction Report link.
Note: The link is displayed when security setting 68: ECommerce Report is enabled.
The following screen is displayed:
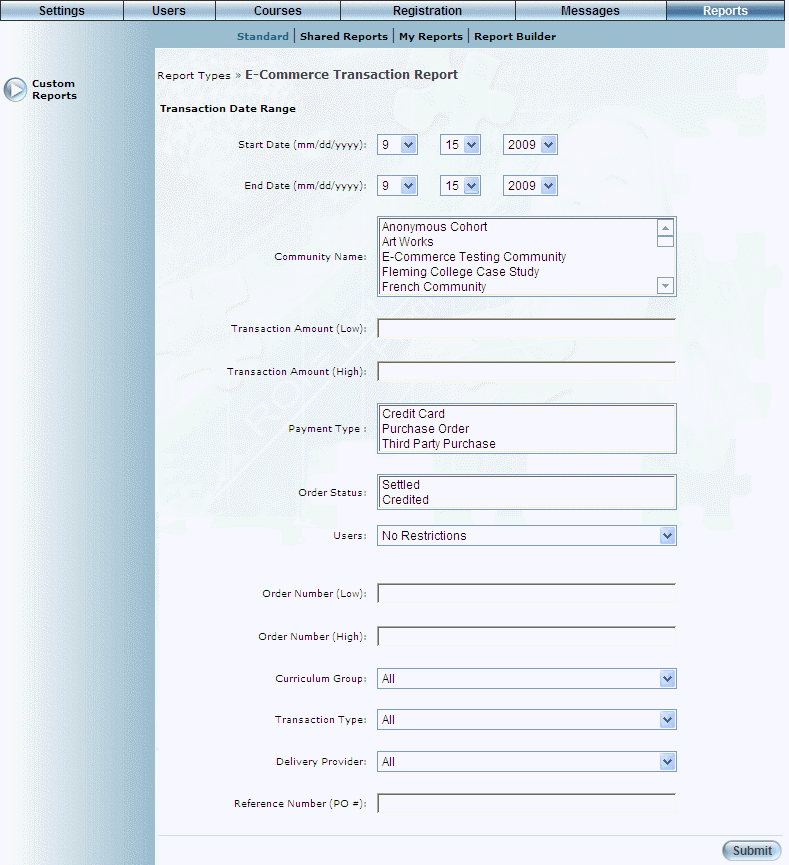
E-Commerce Transaction Report Parameters
3. Use the Start Date and End Date drop-down lists to indicate the date range of the results to be included in the report.
4. Use the Community Name list box to select those communities you want to include in your search.
If you do not select one or more specific communities, the selection defaults to all communities.
5. In the Transaction Amount (Low) field, enter the low range of the transactions you want to include in the report results.
6. In the Transaction Amount (High) field, enter the upper range of the transactions you want to include in the report results.
7. Use the Payment Method list box to select those payment types that you want to include in your report results.
8. Use the Order Status list box to indicate which order statuses (Settled, Credited) you want to include in your report results.
9. Use the Users drop-down list to select those users you want to include in the report.
The possible values are:
· No Restrictions: Incudes all users in the report results.
· Individual: Displays an additional link that you can use to select the user you want to include in your report results. To get results, the user must belong to the community selected earlier.
· Business Unit/Community: Displays two additional list boxes that you can use to select the business unit-community combination for your report.
10. In the Order Number (Low) field, specify the lower range of the order number you want to include in your report results.
11. In the Order Number (High) field, specify the upper range of the order number you want to include in your report results.
12. Use the Curriculum Group drop-down list to specify the curriculum groups that you want to include in the report results.
13. Use the Transaction Type drop-down list to indicate the type of learning activity (course or LearnTrack) that was purchased.
14. Use the Delivery Provider drop-down list to select the delivery provider who provided the learning activity that was purchased.
15. In the Reference Number (PO #) field, enter the purchase order number that you want to include in your report.
16. Click Submit.
The report results are displayed:

E-Commerce Transaction Report - Results
The following columns of information are displayed:
· Transaction ID: Displays the ID associated with the E-Commerce transaction.
· Community: Displays the name of the community.
· Order Number: Displays the number of the order.
· Item Number: Displays the number of items in the order.
· Transaction Date: Displays the date of the transaction.
· Transaction Amount: Displays the amount of the transaction.
· Payment Type: Displays the method of payment.
· Reference Number (PO#): For purchase orders, displays the purchase order number.
· Registration Status Column: Displays the user’s registration status in the learning activity.
· Transaction Status: Displays the status of the transaction.
· Community: Displays the name of the community.
· Last Name: Displays the last name of the person who placed the order.
· First Name: Displays the first name of the person who placed the order.
· Full Name: Displays the user's first and last names.
· User ID: Displays the user's ID.
· User External ID: Displays the external ID of the user.
· Customer Email: Displays the user's email address.
· Business Unit: Displays the business unit to which the user belongs.
· Business Unit External ID: Displays the external ID of the business unit.
· Work Phone #: Displays the work telephone number.
· Curriculum Group: Displays the curriculum group to which the user belongs.
· Academic Unit Title: Displays the name of the bundle involved in the E-Commerce transaction.
· Course Code: Displays the code of the course.
· Delivery Provider: Displays the name of the entity that provided the course.
· <Custom Fields>: Displays details about each custom field.
Hint: You can sort the information by clicking on the column heading (where applicable).
17. You can perform the following operations from this screen:
· Click Printable Version to view a version of the report that you can print.
· Click Microsoft Excel to export your results to a Microsoft Excel spreadsheet.