Procedure
1. From the Registration menu, select Bundle Registration.
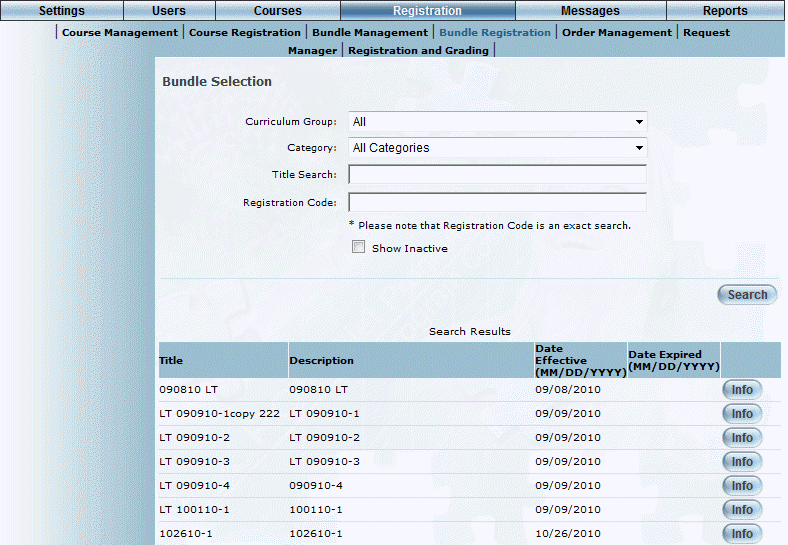
The Bundle Selection screen is displayed:
Searching for a LearnTrack
Use the screen to filter your search results.
2. Use the Curriculum Group drop-down list to filter your results by curriculum group.
3. Use the Category drop-down list to filter your search results by category, including diploma categories.
4. In the Title Search field, enter some or all of the name of the LearnTrack that you want to find.
Leaving this field blank will search for all LearnTrack names that match the other parameters.
5. Use the Registration Code field to filter your results by a registration code.
Note: This field is displayed when security setting 642: Learntrack Registration – Registration Code is enabled.
6. Check the Show Inactive box to include inactive LearnTrack in your search.
Note: This box is displayed when security setting 546: Diploma Registration – Show Inactive Status is enabled.
7. Click the Search button.
Your results are displayed:
Registration LearnTrack Search Results
This generates a list of LearnTracks you can assign to users.
For each bundle in your search results, the following columns of information are displayed:
· Title (link): Displays the title of the LearnTrack.
· Description: Displays the description of the LearnTrack.
· Date Effective: Displays the effective date of the LearnTrack.
· Date Expired: Displays the date when the LearnTrack is set to expire.
Note: You can change the date display of the Date Effective and Date Expired columns through a global setting. Contact your LearnFlex representative for details.
8. You can perform the following operations from this screen:
· Click the Info button for a LearnTrack to view additional information about that LearnTrack. The information is displayed in a pop-up window. You can choose to print this information and/close the window.
· Click a bundle name link to register students into the selected LearnTrack. The following screen is displayed:
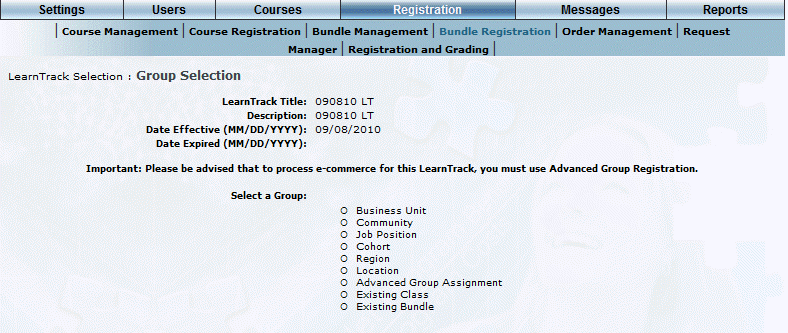
Bundle Registration - Group Selection
9. In the Select a Group section, click the link of the type of group you want to enroll in the LearnTrack.
Note: The following security settings are required to display each of the option buttons:
144: Diploma Registration – Business Unit: Displays the Business Unit option button.
145: Diploma Registration – Community: Displays the Community option button.
146: Diploma Registration – Job Position: Displays the Job Position option button.
147: Diploma Registration – Cohort: Displays the Cohort option button.
148: Diploma Registration – Region: Displays the Region option button.
149: Diploma Registration – Location: Displays the Location option button.
150: Diploma Registration – Advanced: Displays the Advanced Group Assignment option button.
559: Diploma Registration – Existing Class: Displays the Existing Class option button.
560: Diploma Registration – Existing Bundle: Displays the Existing Bundle option button.
Note: At least one of the security settings listed above must be enabled to continue registering a group into a LearnTrack.
The following screen is displayed:
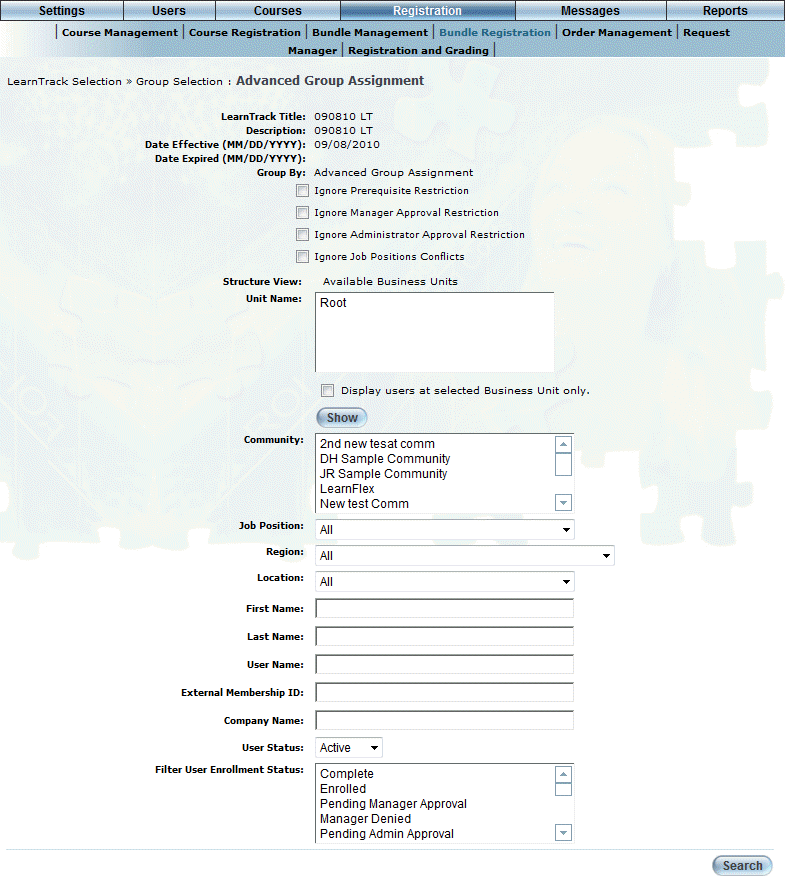
Enrolling Users into a Bundle
Use this screen to determine the list of students who are eligible to be registered in this LearnTrack.
Note: The information (Title, and so on) at the top was displayed on the previous screen.
Hint: You can click the Title link to view details of the LearnTrack in a pop-up window.
10. Check the boxes in the Ignore section to override those students who normally would not be allowed to be registered in the bundle due to insufficient permissions.
However, checking the appropriate boxes means that the restrictions (identified by a Conflict status in the search results) will be ignored in this search instance, giving you will have the ability to register those students.
Note: The following security settings must be enabled to see each of the check boxes:
290: Diploma Registration – Ignore Prerequisites: Displays the Ignore Prerequisite Restriction check box.
291: Diploma Registration – Ignore Manager Approval: Displays the Ignore Manager Approval Restriction check box.
292: Diploma Registration – Ignore Administrator Approval: Displays the Ignore Administrator Approval Restriction check box.
714: Diploma Registration – Ignore Restriction Rules: Displays the Ignore Restriction Rules check box.
735: Diploma Registration – Ignore Job Position Conflicts: Displays the Ignore Job Position Conflicts check box.
11. Continue filtering your list.
12. Once you have finished filtering you list, click Search.
The screen is re-displayed with the search results in the bottom section, as shown below:
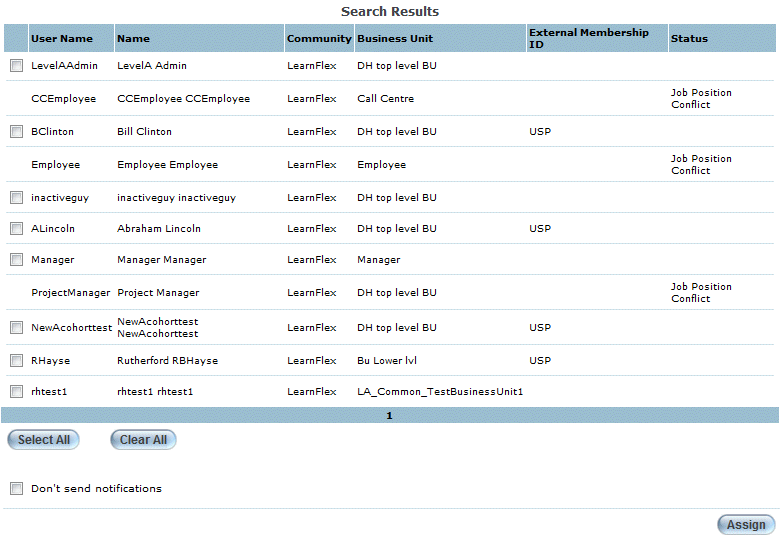
Advanced Group Assignment - Search Results
A maximum of 30 records will be displayed per screen.
13. You can perform the following operations from this screen:
· Assuming that there are users that can be registered in the LearnTrack (those with a status of Completed/Reenroll, or without a status), check the boxes of the users that you want to register. (Available only for the Advanced Group Registration option).
· Click Select All (not shown) to check the boxes of all available users in one operation. Note that this option is available only for the Advanced Group Registration option. For all other types, all users in the search results will be automatically registered when you click Assign.
· Click Clear All (not shown) to remove all check boxes in one operation. Note that this option is available only for the Advanced Group Registration option.
· When displayed, check the Don’t send notifications box if you do not want to inform users that their status in the LearnTrack has changed. By default, this box is not checked.
· After checking at least one box (available only for the Advanced Group Registration option) or after displaying the group you want to register (for all options other than Advanced Group Registration), click Assign to register the users in the LearnTrack. The screen will be re-displayed. The Status column for the selected users will change to Enrolled.