Use this procedure to enroll multiple users into learning activities and to specify the details about their enrollments, such as dates, session titles, and so on. Once an enrollment import has been processed, updated enrollments will display on the users’ learning plan and on the registration screen.
This process can update enrollment information for LearnTracks, using a file saved in either tab-delimited, comma-delimited, or .xml format.
Note: The enrollment import process only imports information for users and learning activities that already exist within LearnFlex. If you require an import of learning activities and users that do not already exist in LearnFlex, contact your LearnFlex representative.
The bundle enrollment import updates user enrollment records with LearnTracks enrollment information as specified in the import file.
Note: The bundle enrollment import updates only the bundle enrollment information, not the enrollment for the individual courses within the bundle. This would happen either manually (by the user or LMS Admin) or automatically (through next system maintenance), depending on the bundle registration rules.
The file that you create for the import may contain manually entered information, or information exported from a source outside of LearnFlex.
1. Open a new Microsoft Excel spreadsheet.
2. Create a header for the import file by entering the titles of the fields that will be updated through the import process.
Note: A header is not required, but if one does not exist, the values must be populated in the order of the field titles listed below. When a header does not exist, the field titles may be arranged in any order, but must be worded exactly as they are below.
The fields available for a bundle enrollment import and their corresponding locations within LearnFlex are as follows:
· BundleEID: Admin mode > Courses > Bundle Management > (select a LearnTrack) > External ID
· UserID: Admin mode > Users > (select a user) > User Name
· RegistrationDate: Admin mode > Registration > Bundle Management > (select a LearnTrack) > (select a registration status) > Date Registered
Note: If you have created the import file from data exported from a source outside of LearnFlex, the spreadsheet may not have a header, or the field titles may be different. Use the field titles above to create a header or change the field titles in the existing header so they match the fields within LearnFlex. These columns can be in any order, but the field titles must be worded exactly as they are shown above.
3. Populate the columns with the values from the applicable fields as described above.
You can refer to the following table for information about the format, whether the field is required or not, and default value of the values used in the bundle enrollment import:
Field Title |
Type |
Required |
Default Value |
BundleEID |
String |
Yes |
No default – The LearnTrack External ID must be present |
UserID |
String |
Yes |
No default – The user name must be present
|
RegistrationDate |
DateTime |
No |
The date and time of the import
|
Note: If the values are populated in the spreadsheet using an export from a source outside of LearnFlex, you will need to delete any columns containing values other than the ones available in the fields described above.
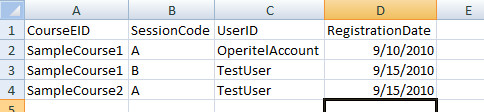
Your spreadsheet should look like the one below:
Populated Import Spreadsheet
4. Save the spreadsheet in one of the following file formats:
· Tab Delimited (.txt)
· Comma Delimited (.csv)
Note: All commas are recognized as delimiters. This format should not be used when the import data in the file contains commas.
· XML (.xml)
1. Once you have accessed the Imports sub-menu of the Courses module, select the Enrollment left-hand side menu item.
The enrollment import screen is displayed, as shown below:
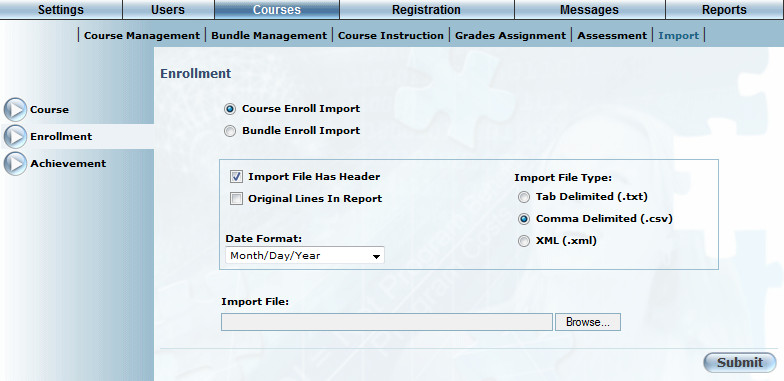
Enrollment Screen
2. Select the Bundle Enroll Import option to indicate that information about individual bundles will be imported or updated.
Hint: To import enrollment information about LearnTracks, see How do I Process Course Enrollment Imports?.
3. Check the Import File has a Header box to indicate that there is a header in the file and that the values in the first row should not be imported.
Note: If there is no header in the file and this box is checked, the first row of data will be ignored and will not be imported.
4. Check the Original Lines In Report box to include the imported values in the import feedback report that is available after the import is complete.
5. Select the format of the file being imported from the following available formats:
· Tab Delimited (.txt)
· Comma Delimited (.csv)
Note: All commas are recognized as delimiters. This format should not be used when the values in the file contains commas.
· XML (.xml)
6. Use the Date Format drop-down list to select the date format specified in the import file.
7. Click Browse to navigate to where the file is stored.
A navigation pop-up window, similar to the one below, is displayed:
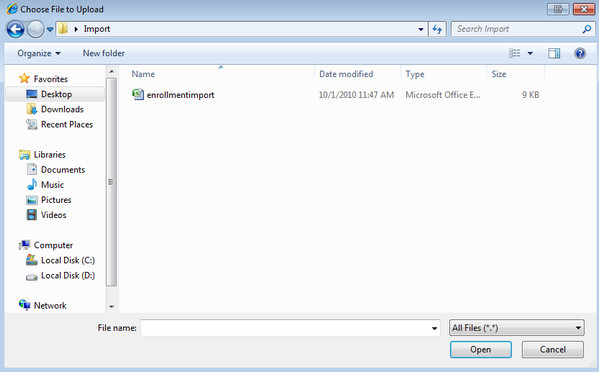
File Upload
8. Locate the file you want to import.
9. Click Open to select the file you want to import.
10. Click Submit on the LearnFlex screen to complete the import.
Once the import is complete, you can view information about the success or failure of the import in two different ways.
1. Scroll down to the bottom of the enrollment import screen to view a simple import status report.
When the import is successful, the feedback is displayed in green as shown below:

Import Feedback
When there are errors in the import, the feedback is displayed in red, as shown next:

Import Feedback Errors
2. Use the Click Here link to download and view a report that displays details about what values were changed through the import:

Import Details
Note: When the Original Lines in Report box is checked (see Step 2 above), the value in the import file that caused the errors is identified.