Introduction
Use this section to create a test in LearnFlex.
Procedure
1. From the Courses menu, select Assessment, then Add New Test.
Note: While it is always displayed, security setting 228: Add New Test must be enabled to display the screen below. If not enabled, then you will receive a permissions error after clicking Add New Test.
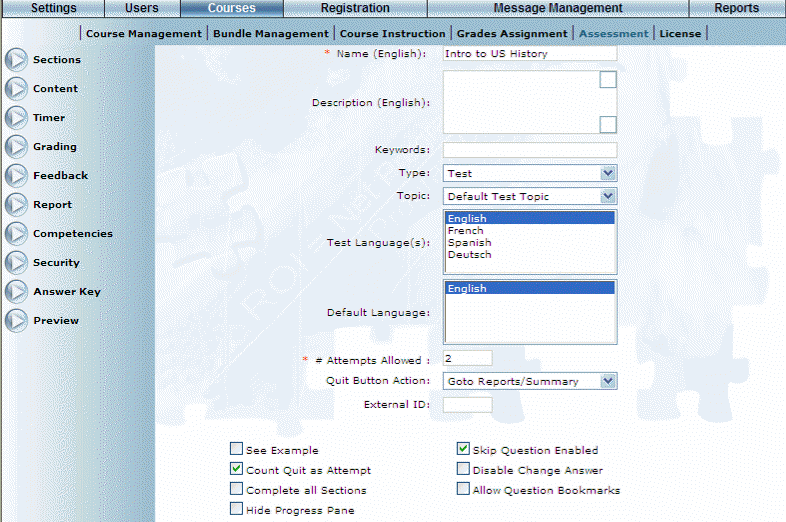
The following screen is displayed:

Adding a Test
2. In the Name field, enter the name of the test that you are creating.
3. In the Description field, enter a description of the test.
For example, you could describe the purpose and contents of the test.
Hint: Pressing Enter will create line breaks in the box.
4. In the Keywords field, enter any words that can be used to locate this test during a search.
5. Use the Type drop-down list to select the type of test that you are creating. For example, you could select final exam or mid-term.
6. Use the Topic drop-down list to specify the topic of the test.
For example, you can specify Unit (Revolution, Civil War).
These values are defined from the Assessment Test Topic module.
7. Select a value from the Test Language box to indicate the language of the test.
8. Select a value in the Default Language box to indicate the default language for the test.
9. In the Attempts Allowed box, specify the maximum number of times that the user can take this test.
Multiple attempts may be allowed for non-critical tests (such as reviews for feedback) but probably not preferred for final exams. Any number entered for course attempts overrides this value.
Note: A value of 0 indicates that users will not have any retries. Therefore, they will be allowed to take the course once.
To give infinite attempts, remove the value in Maximum attempts for course completion field on the Course Additional screen.
10. Use the Quit Button Action drop-down list to specify if a Quit button should be available to users, and the action that will be performed if a user clicks the button.
The actions are Hide (do not display the Quit button), Go to Summary/reports, or Close Window.
11. In the External ID field, enter a value that can be used to reference this test in external reports.
12. Check the See Example box to indicate that a sample question will be displayed on the test.
This can help students understand a question better.
13. Check the Count Quit as Attempt box to specify that quitting a test will be considered as an attempt.
This will be counted in the # of Attempts Allowed tally. Leave this box unchecked to allow users to re-take a test without being penalized.
14. Check the Complete All Sections box to indicate that users must complete the test even if the test taker has a passing score before completing the course.
15. Check the Hide Progress Pane box to hide the progress pane when the user takes a test.
The user will not be able to see their progress or skip ahead or a different part of the test.
16. Check the Skip Question Enabled box to display a button during the test that, when clicked, allows a user to skip a question.
If not checked, then students must answer every question.
17. Check the Disable Change Answer box to prevent a user from changing an answer.
This feature is useful for final exams.
Note: If the test is arranged into multiple sections, then the ability to change answers will only work on a per-section basis. Once a user moves from one section to the next, they will no longer be able to go back to the previous section and change answers.
18. Check the Allow Question Bookmarks box to allow a user to bookmark a question and return to it later.
This is useful for open book tests. If enabled here, then the box will be enabled at the other levels of the test (and vice versa).
Note: If the test is arranged into multiple sections, then the ability to use bookmarks will only work on a per-section basis. Once a user moves from one section to the next, they will no longer be able to use the bookmarks for previous sections (as bookmarks are cleared when a section is closed/completed).
19. Check the Hide Grade box to hide the final test grade on the test completion report.
This is useful for allowing users to see how they are progressing in the learning material without giving them the sense that they are being formally graded.
20. Save your changes.