Introduction
Assigning a user to a business unit is a critical process. Users that are not assigned to a business unit will only be found in an orphan search. They need to be part of a business unit in order to be connected to reporting and tracking.
Procedure
1. From the Users menu, click Add New User.
The Basic Information screen is displayed.
2. After entering and saving basic information, click Business Units.
Note: The left-hand side menu is displayed when security setting 96: Business Units is enabled.
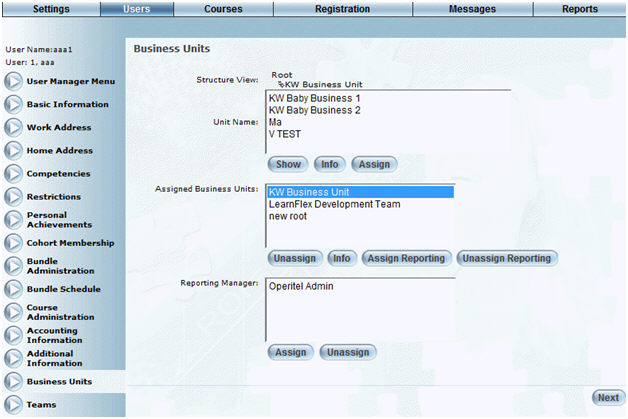
The Business Units screen is displayed:
Business Units for a User
This section allows you to select a business unit to place a user in.
3. Use the top portion of the interface to navigate the business unit structure.
Any changes to the business unit assignment will be shown in the bottom portion of the interface. The Unit Name drop-down contains the current business unit.
4. To show the business units under this one, click the Show button.
The Structure View links show you the business units above the current business unit. You can make any of these links the current business unit in the navigation view by clicking on them.
5. To add a user to a business unit, navigate to the desired business unit and click the Assign button.
6. To specify the business unit whose members will receive manager approval messages about the user, select the business unit’s name from the Assigned Business Units list and then click Assign Reporting.
Note: If no business unit is specified as a reporting business unit, then all users with membership in the business unit directly above that to which the user belongs will receive manager approval messages.
The screen refreshes and the names of all available reporting managers within the selected business unit are populated in the Reporting Managers list. Additionally, the text “(Reporting)” is displayed beside the name of the selected business unit.
Note: Only those members of the selected business units who also belong to cohorts with security setting 666: Manager enabled are displayed in this list.
7. From the Reporting Managers list, select the name of the user who will receive manager approval messages about the user.
8. Click Assign to assign the reporting manager.
9. You can perform the following additional operations from this screen:
· Remove business unit assignment: From the Assigned Business Units list, select the name of the business unit you want to remove and click Unassign.
· Remove the reporting designation from a business unit: From the Assigned Business Units list, select the reporting business unit (identified by the text “(Reporting)” beside the business unit name) you want to remove and then click Unassign Reporting.
· View additional information about business units: Click the Info button under either the Unit Name or the Assigned Business Units list. A pop-up window containing more information about the selected business unit is displayed.