Introduction
Use this section to create a file within an E-Classroom folder. The folder where you add the file determines which users can access it. See E-Classroom Library Overview for details about users and access rights to files and folders.
This section assumes that you have sufficient permissions
All files must reside within a folder, and you cannot add a file to the Root folder.
Procedure
1. In User mode, launch your E-Classroom course from your learning plan.
2. From the Tools menu, select Library.
3. Navigate to the folder where you want to add a file and click its folder icon (not its name).
An Add link will be displayed beside the Folder Options label at the top of the left-hand pane. An example is shown below:

Adding a File to a Folder
4. Click Add.
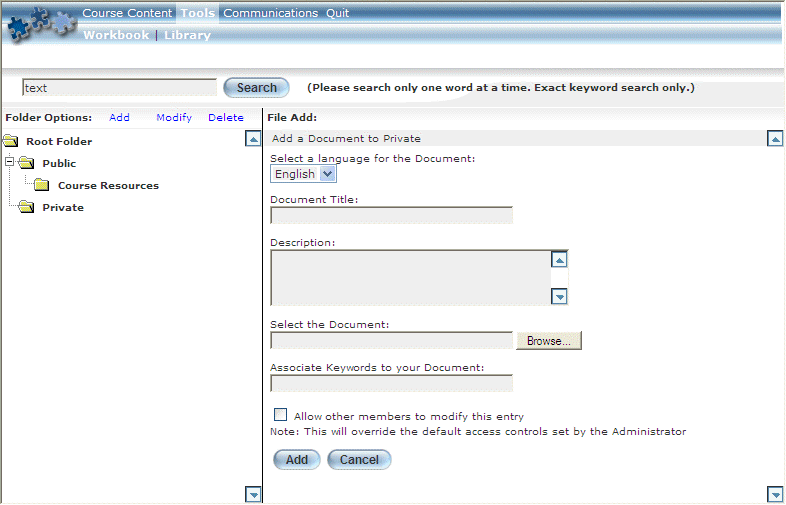
The screen is re-displayed:

Specifying Details of the File Being Added to a Folder
5. Use the drop-down list to select the language for the file that you are uploading.
6. In the Document Title field, enter the name of the document that you are uploading.
This value is required.
7. In the Description text box, enter a brief description of the document that you are uploading.
This value is required.
8. In the Select the Document field, use the Browse button to locate the file that you want to upload to the selected folder.
The list of accepted file types is available in the E-Classroom Library Overview section.
9. In the Associate Keywords to your Document field, enter words that users can enter during a search that will cause this file to be included in the search results.
You can enter only one word per file.
10. Check the Allow Other Members...box if you want other users to be able to modify the selected file.
This will override the default access controls set by the administrator.
11. Click Add.
The screen is re-displayed with the document shown within the selected folder, as shown below:

File Added Successfully to a Folder