Introduction
This report shows a summary of E-Commerce transactions.
Note: The link to this report is displayed when security setting 516: E-Commerce Registration/Transaction Report is enabled.
Procedure
1. From the Reports menu, select Standard, then Advanced Reports.
2. Click the E-Commerce Registration/Transaction Report link.
The following screen is displayed:
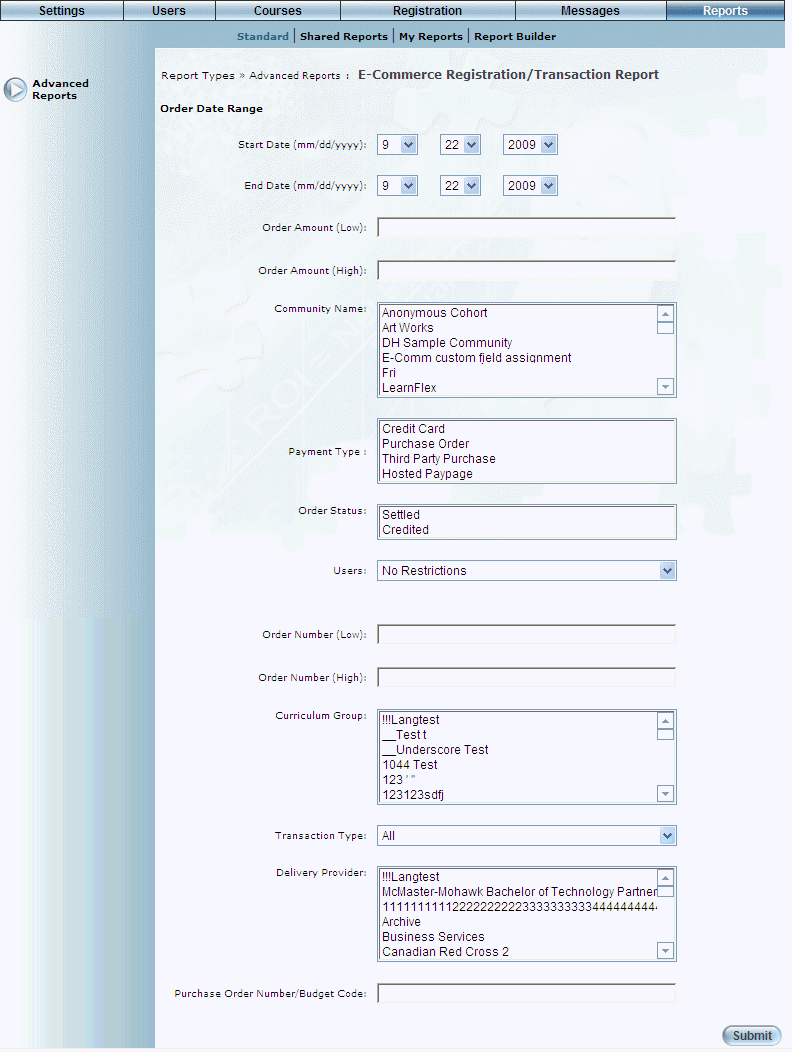
E-Commerce Registration/Transaction Report - Search
3. Use the Date Range - Start Date and End Date drop-down lists to specify the date range of your report results.
4. In the Order Amount (Low) field, enter the lowest order amount to be included in the results.
5. In the Order Amount (High) field, enter the highest order amount to be included in the results.
6. Use the Community Name list box to select one or more communities you want to include in the results.
7. Use the Payment Type list box to select those payment types you want to include in your report.
8. Use the Order Status list box to select one or more order statuses (Settled or Credited).
9. Use the Users drop-down list to select those users you want to include in the report.
The possible values are:
· No Restrictions: Includes all users in the report results.
· Individual: Displays an additional link that you can use to select the user you want to include in your report results. To get results, the user must belong to the community selected earlier.
· Business Unit/Community: Displays two additional list boxes that you can use to select the business unit-community combination for your report.
10. In the Order Number (Low) field, enter the lowest order number to be included in the results.
11. In the Order Number (High) field, enter the highest order number to be included in the results.
12. Use the Curriculum Group list box to select one or more curriculum groups in your results.
13. Use the Transaction Type drop-down list to select one of All, Course, or LearnTrack.
14. Use the Delivery Provider list box to select one or more delivery providers in your results.
15. In the Purchase Order Number/Budget Code field, enter the purchase order number or budget code whose details you want to view.
16. Click Submit.
The following screen is displayed:
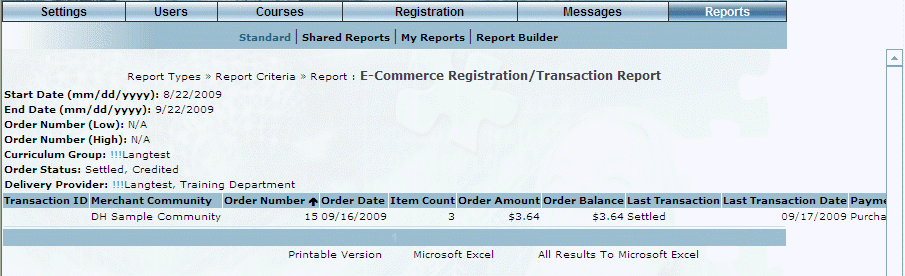
E-Commerce Registration/Transaction Report Results
This screen displays the results of your report. The following columns of information are displayed:
· Transaction ID
· Merchant Community
· Order Number
· Order Date
· Item Count
· Order Amount
· Order Balance
· Last Transaction
· Last Transaction Date
· Payment Type
· Reference Number (PO #)
· Community
· Last Name
· First Name
· Full Name
· User ID
· User External ID
· Customer Email
· Business Unit
· Business Unit External ID
· Company Name
· Work Phone #
· <Custom Fields>
17. You can perform the following operations from this screen:
· Click Printable Version to view a version of the report that you can print.
· Click Microsoft Excel to export your results to a Microsoft Excel spreadsheet.
· Click All Results to Microsoft Excel as needed.